How to Clear All Underlying Cell Formatting in Excel

Clear Underlying Formatting

Clear Underlying Formatting

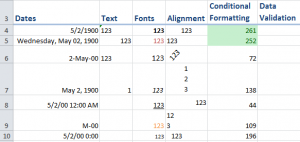
Have you ever typed data or a formula in a cell only to be surprised by the result? For example, you type in a number and then, unexpectedly,  Excel displays a Date or a Time in that cell. This happens frequently when you reuse an older Excel Worksheet of if you start working on a worksheet that a colleague or client has sent you.

Why does this happen?

Clear All Underlying Cell Formatting

In my experience, I have found that many Excel users mistakenly think that pressing the DELETE Key will “erase” the cells in the selection. No, No, No. The Delete key only erased the cell content – the data, text or formulas entered or pasted into the cell(s). The Delete key does NOT remove the Underlying Cell Formatting!

In this tutorial, I demonstrate how to remove the underlying cell formatting while leaving the cell Contents in place.

Topics Covered in this Tutorial

  • Using the Clear Formatting Command
  • Adding the Clear Command to your Quick Access Toolbar
  • Using Go To Special to Find and Select all cell that use either Conditional Formatting or Data Validation
  • Finding the Last Cell in your worksheet – you may be surprised to find a “remote cell” is NOT Blank!

View All the Resources that I Offer

I invite you to visit my secure online shopping website – http://shop.thecompanyrocks.com – to preview all of the resources that I offer.

Watch this Tutorial in High Definition

Follow this link to view this Excel Tutorial in High Definition on my YouTube Channel – DannyRocksExcels
 

Share and Enjoy:
  • Add to favorites
  • Facebook
  • Twitter
  • Technorati
  • Print
  • email
  • Digg
  • StumbleUpon
  • del.icio.us
  • Yahoo! Buzz
  • Google Bookmarks
  • Orkut
  • SphereIt
  • Sphinn

Summarizing Employee Hours Worked and Vacation Time over 52 Weeks in Excel

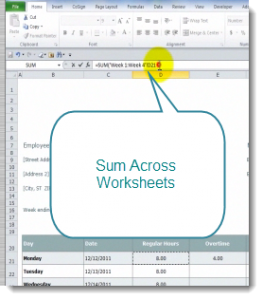
Sum Across Worksheets

Sum Across Worksheets

This is the third episode in my series of Excel Tutorials where I share my best practices for creating an Excel Workbook that contains 52 weeks of Employee Time Cards. In this lesson, I focus on techniques to Summarize – or Consolidate – the hours worked or taken as vacation, by each employee, over a period of several weeks.

Sum Across Worksheets

This is a great tip to learn! In my experience, I find that very few experienced users of Excel know that you can do this! This will eliminate the hassle of linking to a cell in individual worksheets to create your formula. There is, after all, a limit to the number of characters that you are allowed in a formula!

Consolidate Data By Position

Since each worksheet in this workbook is identical in structure, Data Consolidation is simple. Provided, that is, that you remember to “Add” each worksheet range reference in the Dialog Box. In this example, I have “created a link” to each worksheet so that the data can be easily updated.

Links to Other Tutorials in this Series

Shop for Additional Resources

I invite you to visit my new, secure online shopping website – http://shop.thecompanyrocks.com – where you can preview all of the resources that I offer you.

Watch Tutorial in High Definition

Follow this link to view this Excel Tutorial in High Definition on my YouTube Channel – DannyRocksExcels

Share and Enjoy:
  • Add to favorites
  • Facebook
  • Twitter
  • Technorati
  • Print
  • email
  • Digg
  • StumbleUpon
  • del.icio.us
  • Yahoo! Buzz
  • Google Bookmarks
  • Orkut
  • SphereIt
  • Sphinn

The 10 Most Watched Videos at The Company Rocks During 2010

Reminder Note

Reminder Note

I like to look back to review the results of the past year. Which posts, which videos were the most popular, which videos were downloaded most often? As I look at this list of 10 videos, the clear winner – by category – is merging data from multiple worksheets. Three of the top 10 videos that were watch the most fall into this category!

Here is a listing of the 10 Video Lessons that were watched most frequently on my website – www.thecompanyrocks.com – during 2010:

1- Summarize Multiple Excel Worksheets – Consolidate by Position

2- Build an Accounts Receivable Aging Report

3- Use Pivot Tables to Summarize by Year, Quarter and Month

4- Simplify Data Lookups in Excel

5- Perform Break-Even Analysis with Excel’s Goal Seek Tool

6- How to Display Numbers During a PowerPoint Presentation

7- Make Excel Data Come Alive with Visualization Tools

8-  Excel 2003 Basics – Data Entry

9- How to Merge Multiple Excel Workbooks into a Master Budget

10- Consolidate Data from Multiple Excel Worksheets – Part 2 – by Category

If you enjoy these videos, you will enjoy my DVD-ROMs, “The 50 Best Tips for Excel 2007” and “The 50 Best Tips for PowerPoint 2007.” You can use my secure shopping cart to purchase them now.

I have reduced the purchase price of my Individual DVD-ROMs to $29.97 USD. You do not need a coupon to receive this special price. Simply, go to my online store – http://shop.thecompanyrocks.com

You can also watch my videos on iTunes. Click here to go to my Video Podcast, “Danny Rocks Tips and Timesavers” at the iTunes Store.

Learn how to “Master Excel in Minutes – Not Months!”

My most recent videos can be viewed in High Definition, Full Screen Mode on my YouTube Channel – DannyRocksExcels

Share and Enjoy:
  • Add to favorites
  • Facebook
  • Twitter
  • Technorati
  • Print
  • email
  • Digg
  • StumbleUpon
  • del.icio.us
  • Yahoo! Buzz
  • Google Bookmarks
  • Orkut
  • SphereIt
  • Sphinn

My Most Viewed and Downloaded Videos for Excel and PowerPoint

My iTunes Podcast

Danny on iTunes

I began to post my videos as podcasts at the iTunes store this past summer. Since then, my video lessons for Excel and PowerPoint have been viewed and downloaded many times. I am thirlled. And, I thank you for your support and encouragement.

Here are the links – on my website – to the most popular video episodes. I have organized them by category in the order of their popularity. You can click on any link to view or download that video from my website. Or, you can go to my video Podcast by clicking on this link – “Danny Rocks Tips and Timesavers” Podcast on iTunes.

Merging and Consolidating Excel Worksheets

 PowerPoint Presentations

Data Visualizations

What-If Analysis in Excel

Importing Data From Other Programs

Pivot Tables

Excel Tables

Social Media

Formula Errors

Please add your comments below – or on my iTunes Channel. I welcome your feedback.

You can learn how to “Master Excel in Minutes – Not Months!”

Sincerely,

Danny Rocks

Share and Enjoy:
  • Add to favorites
  • Facebook
  • Twitter
  • Technorati
  • Print
  • email
  • Digg
  • StumbleUpon
  • del.icio.us
  • Yahoo! Buzz
  • Google Bookmarks
  • Orkut
  • SphereIt
  • Sphinn

Consolidate Data from Multiple Excel Workhseets Part 2

In Part One, I showed you how to Consolidate Data By Position –  where the range of cells was consistent in each of the Excel worksheets –  Click on this link to go to this lesson.

Consolidate Data By Category

In this lesson, I show you how to Consolidate Data By Category / By Label. You use this technique when the number of rows or columns containing values varies from worksheet to worksheet. For example, the number of sales representatives reporting may change each month. Or, some of the worksheets that you receive contain an extra column that you want to include in your consolidation. Consolidating Data by Category is very flexible as you will see in this lesson.

Learn how to “Master Excel in Minutes – Not Months!”

Share and Enjoy:
  • Add to favorites
  • Facebook
  • Twitter
  • Technorati
  • Print
  • email
  • Digg
  • StumbleUpon
  • del.icio.us
  • Yahoo! Buzz
  • Google Bookmarks
  • Orkut
  • SphereIt
  • Sphinn

Summarize Multiple Excel Worksheets – Consolidate Data By Position

There are many ways to Summarize the data that is stored in multiple Excel Worksheets or Workbooks. Pivot Tables are great for producing summaries. However, many people do not use – or do not know how to use – Pivot Tables, so let me demonstrate how to use Excel’s Consolidate Data Tool to get the job done.

Consolidate Data By Position

In this scenario, I will take the data from four identical worksheets and consolidate the sales numbers in a new worksheet. First, without using a “Link” to keep the data in the consolidated worksheet current and then I show you how to create a link to the Source Data.

But… there is a “Got’cha Step” when you link sources. It is possible to “double your sales numbers” without realizing it! This might make you feel good when you first see this. However, this is not good – when you are found out. And, trust me on this, someone will definitely find this error!

SUM Across Group of Excel Worksheets

As a bonus, I include another technique to SUM cells from multiple worksheets. Watch as I show you this “trick” – how to use the SUM() Function to total data across a contiguous group of Excel worksheets. It really is a great tip to learn!

Watch My Video on YouTube

Follow this link to watch my tutorial on my YouTube Channel – DannyRocksExcels

Related Video Tutorials

I continue this lesson on Data Consolidation in Part Two. Click on this link to see how to Consolidate Data By Category.

Watch my Video on iTunes

You can download and view this Excel Training Video at the iTunes Store. Follow this link to subscribe to the “Danny Rocks Tips and Timesavers” podcast.

My Video Training Resources

You can learn “The 50 Best Tips, Tricks and Techniques for Excel 2007” when you purchase my DVD – ROM!

Learn how to “Master Excel in Minutes – Not Months!”

Share and Enjoy:
  • Add to favorites
  • Facebook
  • Twitter
  • Technorati
  • Print
  • email
  • Digg
  • StumbleUpon
  • del.icio.us
  • Yahoo! Buzz
  • Google Bookmarks
  • Orkut
  • SphereIt
  • Sphinn

Consolidate Data as a Quick Alternative to Subtotals

I have a great tip for you! When you need to produce a quick summary report of your data, use Consolidate in place of Subtotals. Here’s why:

  • You don’t have to sort the data when you consolidate.
  • You can use multiple functions (SUM, AVERAGE) in adjacent columns in your report.
  • You can easily copy and paste the Consolidated Summary Report to another workbook or into Word.

Watch this short video as I demonstrate how to use Data Consolidate in place of Subtotals.

Steps to follow in this lesson:

  1. Select an empty cell. Choose Data – Consolidate.
  2. In the dialog box, choose the Function that you want (SUM is the most common) and then select your data range (including the Column Headers) and click ADD.
  3. Be sure to check the Use Labels in “Top Row” and “Left Column.” Click OK
  4. A quirk – The Label for the Category does not appear when you Consolidate Data – Simply copy & paste it from cell A1.
  5. Repeat these steps to add an additional Function – e.g. AVERAGE to your Consolidation Report.
  6. Copy and paste the Consolidated Data to another workbook or to another application – e.g. MS Word.
  7. Contrast this quick alternative to creating Subtotals.
  8. The real “Time Saver” comes from the ability to quickly copy the Consolidated Summary.
  9. The “Gotcha” to remember with Subtotals is to choose “Edit – Go To – Special – Visible Cells Only” before you copy the Level 2 Subtotals. If you omit this step, you will discover that you have copied ALL of the data and not just the summary!

Find the Excel Training Video that you want – Click here for the Index to all Excel Topics

Learn how to “Master Excel in Minutes – Not Months!”

Share and Enjoy:
  • Add to favorites
  • Facebook
  • Twitter
  • Technorati
  • Print
  • email
  • Digg
  • StumbleUpon
  • del.icio.us
  • Yahoo! Buzz
  • Google Bookmarks
  • Orkut
  • SphereIt
  • Sphinn