How to Dynamically Color-Code Dates with Conditional Formatting in Excel

Conditional Formatting for Dates

Conditional Formatting for Dates

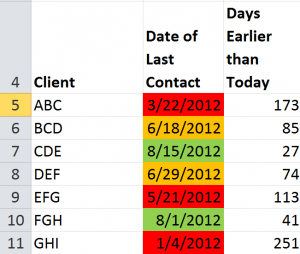
One of my viewers wants to learn how to “dynamically” color-code cells that contain dates. She is monitoring the frequency of contact with her clients and she wants Excel to automatically apply:

  • One background color to cells where it has been less than 60 days since last contact
  • A different color when the time frame is between 60 and 90 days
  • A third color when it has been over 90 days since the last contact with a client

Here, I demonstrate how she can do this using Conditional Formatting Rules. However, this will only work if you are using Excel 2007 or Excel 2010.

Understanding Dynamic Date Functions

In order to make this visualization “dynamic,” I make references to cells that contain the =TODAY() Function. This is a “volatile” function that updates automatically based upon the date in your computer system’s clock. I use this to classify the last date of contact with her clients.

Improvements in Conditional Formatting

Beginning with Excel 2007, you can now apply multiple rules that use formulas. Remember that when you use a formula, it must evaluate as “TRUE” in order to apply the formatting that you specify.

Formulas Used to Apply Conditional Formatting

Conditional Formatting Rules

Rules for Conditional Formatting

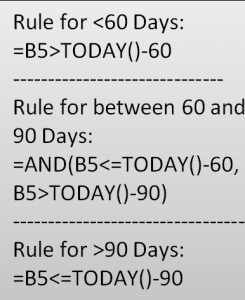
To make it easier for you to practice this skill, I have posted this table that details the formulas that I used for each of the three rules in my video tutorial.Note that with the middle condition, I use the =AND() Function. All logical tests must answer TRUE for the AND() Function to return TRUE.

It will take a little bit of practice for you to become comfortable with these formulas. As a Best Practice, I recommend that you create a table of formulas so that you can see how a “tweak” in your formula can turn a FALSE answer into a TRUE answer.

Related Video

Follow this link to Part Two in this Series. I demonstrate how to “toggle” Conditional Formatting On or Off by using a Check Box Control in Excel.

Watch this Video in High Definition

Follow this link to watch my Excel Tutorial in High Definition on my YouTube Channel – DannyRocksExcels

Get the Best Tips and Training for Excel

Click on this link to learn more about my best-selling DVD-ROM, “The 50 Best Tips for Excel 2007.” This link will take you to my secure online shopping website –  http://shop.thecompanyrocks.com

Subscribe to my Video Podcast on iTunes

Here is the link to go to my free Video Podcast, “Danny Rocks Tips and Timesavers” on iTunes.


Share and Enjoy:
  • Add to favorites
  • Facebook
  • Twitter
  • Technorati
  • Print
  • email
  • Digg
  • StumbleUpon
  • del.icio.us
  • Yahoo! Buzz
  • Google Bookmarks
  • Orkut
  • SphereIt
  • Sphinn

How to Group People by Age Bracket Using an Excel Pivot Table

Pivot Table for Age Brackets

Pivot Table to Group Age Brackets

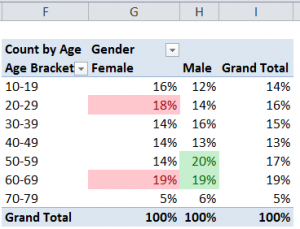
In my previous Excel Tutorial, I demonstrated how to use the Group Field command in a Pivot Table to summarize time periods by the Hour. Several viewers wanted to know what other grouping possibilities are available in Pivot Tables. One viewer wanted to know how to group people who responded to a survey by Age Brackets. That is why I created this tutorial!

Use DATEDIF Function to Calculate Age

From my perspective, the DATEDIF() is an invaluable function. However, it is not documented in Excel. Watch how I use its three arguments to calculate the age of each person in the data set.

Group Field by Age

Select a single value in the “Age” Field and then select the “Group Field” Command. In the dialog box, choose the “step-value” for your groups. In this case, I chose the Default Setting of 10 years.

Show Pivot Table Values As

Some of the most powerful Pivot Table tools are found on the “Show Values As” tab of the “Value Field Settings” Dialog Box. Watch me demonstrate how to show each Age Bracket as a Percentage of the Column.

Apply Conditional Formatting to Pivot Table

Take advantage of the greatly improved Conditional Formatting Commands in Excel 2007 and Excel 2010 to focus attention on the key information in your Pivot Table. In this case, I use the “Top 10 Items” rule to apply Conditional Formatting to the two highest Age Brackets- by percentage – for each gender.

Learn Excel Pivot Tables Quickly

Follow this link to learn about the focused 90 minute video tutorials that I have published to help you to really learn how to get the most out of Pivot Tables. Available in versions for Excel 2003, Excel 2007, and Excel 2010.

Watch Tutorial in High Definition

Click on this link to watch this Excel Tutorial in High Definition on my YouTube Channel – DannyRocksExcels


Share and Enjoy:
  • Add to favorites
  • Facebook
  • Twitter
  • Technorati
  • Print
  • email
  • Digg
  • StumbleUpon
  • del.icio.us
  • Yahoo! Buzz
  • Google Bookmarks
  • Orkut
  • SphereIt
  • Sphinn

How to Calculate the Calendar Year Quarter for a Date in Excel

Formulas to Calculate a Calendar Year Quarter

Formulas to Calculate a Calendar Year Quarter

After watching my previous video tutorial, “How to Place Dates in a Fiscal Year Quarter,” several viewers requested that I demonstrate how to calculate the calendar year quarter for a date.

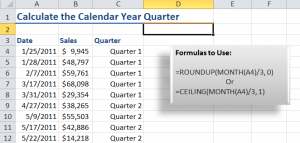
This requires “nesting” the MONTH() /3 Function inside either the ROUNDUP() or the CEILING() Function. I break these formulas down step-by-step in this video so that you can see how they work.

Formatting Numbers to Include Text

As a bonus, I demonstrate how to format the formula result cells to include the text “Quarter.” This is really simple to create as a custom format.

Download this Video Podcast from iTunes

You can watch and download this – and many of my – video tutorials for free at iTunes. Here is the link to my iTunes video podcast, “Danny Rocks Tips and Timesavers.”

Watch Video in High Definition

Follow this link to watch this Excel Tutorial in High Definition on my YouTube Channel – DannyRocksExcels

Visit my Secure Online Shopping Website

I invite you to visit my online shopping site – http://shop.thecompanyrocks.com – to preview and purchase my training resources. I guarantee your satisfaction 100%. I will refund your purchase if, for any reason, you are not satisfied with my products!


Share and Enjoy:
  • Add to favorites
  • Facebook
  • Twitter
  • Technorati
  • Print
  • email
  • Digg
  • StumbleUpon
  • del.icio.us
  • Yahoo! Buzz
  • Google Bookmarks
  • Orkut
  • SphereIt
  • Sphinn

How to Place Dates in a Fiscal Year Quarter

Many organizations operate in a Fiscal Year – for example, April 1 through March 31 of the next calendar year. I get many requests from viewers for help with placing calendar dates into the proper Quarter for their Fiscal Year.

Excel Functions Used in Video TutorialWhile researching a question from one viewer, I cam across a very interesting formula that nests the “undocumented” DATEDIF() Function inside the CEILING() Function. I found this formula in the book, “Formulas and Functions with MS Excel 2003,” written by Paul McFedries. It is a very efficient formula.

What is Covered on the Video

Watch this video tutorial as I break down each step. As a Best Practice, I recommend that you break down a complex formula by working from the “inside out.” I start with the “nested” DATEDIF() function and then demonstrate the results of each formula detail.

Learn More About the “Undocumented” DATEDIF() Function

For various reasons, Microsoft does not offer any help or documentation for the very useful DATEDIF() Function. In fact, it is not even listed as a Function! However, it is very useful and often found in VBA (Visual Basic for Applications) coding. Here, are links to two videos that I created to help you understand how to use DATEDIF():

Learn How to Calculate a Calendar Year Quarter

In response to viewer requests, I created a companion video tutorial -” How to Calculate a Calendar Year Quarter in Excel.”

Resources Available at The Company Rocks

I invite you to visit my secure online shopping website – http://shop.thecompanyrocks.com – to preview the many resources that I offer for helping you to improve your software skills.

Watch Video Tutorial in High Definition

If you would like to watch my video tutorial for “Finding the Fiscal Year Quarter for any Date,” click on this link. I have posted it on my YouTube Channel – DannyRocksExcels

Watch this Video Now


Share and Enjoy:
  • Add to favorites
  • Facebook
  • Twitter
  • Technorati
  • Print
  • email
  • Digg
  • StumbleUpon
  • del.icio.us
  • Yahoo! Buzz
  • Google Bookmarks
  • Orkut
  • SphereIt
  • Sphinn

How to Perform Time Period Calculations in Excel

Time Calculations in Excel

Time Calculations in Excel

Judging by the number of calls that I get from my viewers, working with Time Period Calculations is one of the most problematic challenges in Excel. My goal for this tutorial is to demonstrate how you can easily avoid the frustrations when you calculate elapsed time and total a series of time – e.g. hours worked during the week.

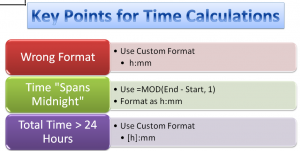
Apply a Custom Format to Formula Cells

When you create an Excel Formula that subtracts a Start Time from an End Time, you are likely to get a result that looks like 2:30 AM. This is not what you want to see! The solution is to apply a Custom Time Format – e.g. h:mm – to the formula cell(s).

Time that “Spans Midnight”

Many people work the “Graveyard Shift.” The start work late in the evening and they end work early the next morning. The problem that occurs when you want to calculate the number of hours worked is that Excel believes that you are performing a “negative time” operation and the result is a cell filled with ######## (Hash Marks). This happens because Excel thinks that both the Start Time and the End Time belong in the same day. To solve this, you could use an IF() Function formula. However, there is a much easier formula to use as I demonstrate in this video. It uses the MOD() Function.

Total Hours Worked

Use the SUM() function to total 8:00 hours worked each weekday. You are expecting to see 40:00 hours worked. So why does Excel return 16:00 hours instead? By default, Excel interprets 24:00 hours as a single day. So it subtracts 24:00 from the 40:00 hours worked to return 16:00 hours. Unless you make a formatting change to the formula cell you are going to have many unhappy and under paid employees.

The solution? Apply the [h]:mm Custom Formatting to the Formula Cells. Amazingly enough, Excel does not include [h]:mm as one of the Custom Formats in the list. So, simply edit one of the other formats and you will now have the correct answer displayed for your formula!

Learn More Tips for Excel

I invite you to visit my secure online shopping website – http:shop.thecompanyrocks.com – to preview all of the resources that I offer including “The 50 Best Tips for Excel 2007” DVD-ROM.

Subscribe to the “Danny Rocks Tips and Timesavers” Video Podcast on iTunes

I offer a free video podcast for many of my video tutorials at the iTunes Store. Follow this link to see all of the Podcasts that I have posted. If you like what you see, I invite you to subscribe to this free service.

Watch Tutorial in High Definition

You can view this tutorial in High Definition on my YouTube Channel – DannyRocksExcels.


Share and Enjoy:
  • Add to favorites
  • Facebook
  • Twitter
  • Technorati
  • Print
  • email
  • Digg
  • StumbleUpon
  • del.icio.us
  • Yahoo! Buzz
  • Google Bookmarks
  • Orkut
  • SphereIt
  • Sphinn

Use Excel’s AutoFill Tools and Formulas to Increment Time Intervals

In my experience, many Excel users get “frustrated” when trying to enter and calculate Time Intervals. For example, setting up a schedule for meetings that begin and end in 45 minute intervals. After you watch this video tutorial, you will learn how easy it is to set up this type of schedule!

The Problem with Time in Excel

When it comes to entering Time Values, Excel will only accept a short list of Time Formats. For example, 6:00 AM is a valid Time Entry in Excel. However, Excel will treat 6:00 A.M. as a “text entry!” 6:00 AM is stored as the decimal value 0.25 in Excel. Decimals are numbers that Excel can calculate and increment. In this video, I demonstrate a shortcut that ensures that you always enter a Time Value as a Number.

How to Increment in Two-Hour Intervals

As I demonstrate in this video, use this formula to increment a series of two-hour time intervals:

=starting_cell + 2*(1/24)

In this case the (1/24) portion of the formula indicates a “one-hour segment.” 1 hour out of a 24 hour day. The +2 part of the formula indicates that you want to increment by 2 – of what? The answer is +2*(1/24) – by 2 hours.

To indicate a 15 minute increment use this formula:

=starting_cell + 15 * (1/24/60) – That is, divide each one hour segment (1/24) by 60 minutes (1/24/60) and multiply this by the number of minutes that you wish for your schedule.

Watch Part 1 of this Series – Increment Dates in Excel

Follow this link to watch Part 1 of this two-part series – “Use Excel’s AutoFill Tolls and Excel Functions and Formulas to Increment Date Intervals.”

View this Tutorial in High Defintion on YouTube

Click on this link to watch the video lesson in High Definition on my YouTube Channel – DannyRocksExcels

Get my best-selling DVD-ROM, “The 50 Best Tips for Excel 2007 for only $29.97

Share and Enjoy:
  • Add to favorites
  • Facebook
  • Twitter
  • Technorati
  • Print
  • email
  • Digg
  • StumbleUpon
  • del.icio.us
  • Yahoo! Buzz
  • Google Bookmarks
  • Orkut
  • SphereIt
  • Sphinn

Use Excel’s AutoFill Options and Formulas to Increment a Series of Dates

Excel AutoFill Options

Excel AutoFill Options

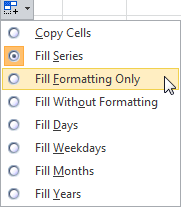
I begin this Excel Video tutorial by first, demonstrating how to use Excel’s AutoFill Options to increment a series of dates. Some of these AutoFill Options are:

  • Fill Weekdays Only (Monday through Friday)
  • Copy Formatting Only
  • Increment by Adding one month to the previous cell
  • Increment by Adding one year to the previous cell

Here’s a Tip: If you use your Right-mouse button to AutoFill a series, a menu of options will pop up automatically when you release the mouse. Try it!

Excel Functions and Formulas to Increment a Series of Dates

Two of my favorite Excel Date Functions are part of the “Analysis ToolPak” Add-in:

  1. The EDATE() Function – returns a “serial number” for a Month that is X number of months away from the starting date.
  2. The EOMONTH() Function – is similar to EDATE. However, it always returns the last Calendar Day of the Month that is X  number of months away from the starting date.

In Excel 2007 and Excel 2010, the Analysis ToolPak Add-in is activated by default. In this video, I demonstrate how to activate it if you are using Excel 2003 or older.

Other Functions Used in this Video Tutorial

  1. The DATE() Function. Remember that if you use this function to increment by one-year intervals that you need to “nest” the Year(), Month() and Day() functions in the arguments. This is a “tricky” function to use.
  2. The WEEKDAY() Function. In the video, I nest this function inside an IF() Function in order to get a series of dates that include Monday through Friday only!

Related Video Tutorial

My next video in this series demonstrates how to use Formulas to increment a series of times by “minutes” or by “hours.”

Watch This Video in High Definition

Follow this link to view this video tutorial in High Definition on my YouTube Channel – DannyRocksExcels

Shop for Excel Training Resources

Shop for The 50 Best Tips for Excel 2007

Shop for The 50 Best Tips for Excel 2007

I invite you to visit my secure online shopping website – http://shop.thecompanyrocks.com – to see all of the great training resources that I offer you.

Get my best-selling DVD-ROM, “The 50 Best Tips for Excel 2007” for only $39.95!


Share and Enjoy:
  • Add to favorites
  • Facebook
  • Twitter
  • Technorati
  • Print
  • email
  • Digg
  • StumbleUpon
  • del.icio.us
  • Yahoo! Buzz
  • Google Bookmarks
  • Orkut
  • SphereIt
  • Sphinn

How to Convert from Military to Standard Time in Excel

Viewers and clients frequently ask me how to convert times displayed as military time (1700 hours) to standard time (5:00 PM). Many conpanies capture time using the 24 hour clock (military time) however, many end-users, particularly in the United States want to see time expressed as standard time with AM and PM designations. 

Time on Clock

Digital Time

Time Stored as Text Value or as a Number?

The first step in the conversion is to determine how the time value is “stored” in Excel. Is it stored as a “text value” or is it stored as a numeric value? This will determine how we convert military time to standard time. In this lesson, I demonstrate how to extract text characters, join text strings and then use the TIMEVALUE() Function in Excel to make this conversion. 

Use Text Functions and the “&” (ampersand)

Next, I use the LEFT() function to extract the two left-most characters from the text string (0100) and the RIGHT() function to extract the two right-most characters. In Excel, you use the “&” (ampersand) to join text strings. When you insert the “:” (colon) between the hours and the minutes, be sure to enclose it inside ” “(double quote marks). 

The TIMEVALUE() Function

In order to perform time elapsed calculations in Excel, you need to have time values “stored” as numeric values. You can use the “visual clue” – to which side of the cell is the time value aligned? Text values align to the left side of the cell; numeric values align to the right side of the cell. After you use the TIMEVALUE() function, be sure to format the numeric time values to meet your needs. 

If you import time values that are “stored” as numbers – they align to the right side of the cell – but are formatted as military time (13:30) all you have to do is change the fomratting to standard time (1:30 PM). 

Follow this link to watch this video lesson in High Definition, Full Screen mode on YouTube. My channel is DannyRocksExcels.

I invite you to subscribe to my video podcast, “Danny Rocks Tips and Timesavers,” available for free on iTunes. Click here to view my videos at the iTunes store.

Visit My New Online Shopping Website

I invite you to visit my new, secure shopping website – http://shop.thecompanyrocks.com – where you can view all of my products and “Learn how to “Master Excel in Minutes – Not Months!”

Share and Enjoy:
  • Add to favorites
  • Facebook
  • Twitter
  • Technorati
  • Print
  • email
  • Digg
  • StumbleUpon
  • del.icio.us
  • Yahoo! Buzz
  • Google Bookmarks
  • Orkut
  • SphereIt
  • Sphinn

How to Calculate Overtime and Standard Hours Worked on a Time Card in Excel

One of my viewers asked me to show him how to calculate the number of hours worked each day – separated by standard hours and by overtime hours. He, like many Excel users, is frustrated when performing calculations involving time. They create a standard formula, but the results are not what they were expecting. In most cases, this is because of the need to FORMAT the cells that contain calculations to accommodate Excel’s logic.

Excel Time Card

Excel Time Card

Time Functions and Formats

In this lesson, I demonstrate the following functions and formats:

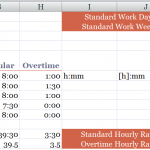
  • The =TIME() Function requires three arguments (Hours, Minutes, Seconds). In this example, I use =TIME(8,0,0) in a cell to represent the Standard Hours Worked each day – i.e. 8 hours.
  • The CUSTOM Format h:mm to format the cells that contain the results of time calculations (Total Hours Worked each day, Regular and Overtime Hours Worked each day).
  • The CUSTOM Format [h]:mm to format the cells that contain the results of SUM() for the Total Hours, Regular and Overtime Hours Worked each WEEK – i.e. Hours that exceed 24 hours
  • The Formula =SUM(Overtime Hours Worked this week) * 24 to gives me the NUMBER equivalent – Remember to format this cell as a NUMBER – not as [h]:mm,  so that you can multiply it by the cell that contains the Hourly Rate that you pay for either Regular Hours or Overtime Hours.

How Time is Stored vs. How Time is Displayed

Remember to distinguish between what Excel Stores as a calculation and how Excel Displays the result of a calculation. This is especially important with TIME and DATE Calculations in Excel.

You can view this lesson in High Defintion, Full Screen Mode on my YouTube Channel – DannyRocksExcels – by clicking this link.

I invite you to subscribe to my free Video Podcast – “Danny Rocks Tips and Timesavers”- at the iTune Store by clicking here.

Vist my Online Shopping Site

My DVD-ROM, “The 50 Best Tips for Excel 2007” is on sale at my Online Bookstore – http://shop.thecompanyrocks.com –  Click here to open a secure shopping cart.

Learn how to “Master Excel in Minutes – Not Months”

Share and Enjoy:
  • Add to favorites
  • Facebook
  • Twitter
  • Technorati
  • Print
  • email
  • Digg
  • StumbleUpon
  • del.icio.us
  • Yahoo! Buzz
  • Google Bookmarks
  • Orkut
  • SphereIt
  • Sphinn

Learn How to Use Date Functions in Excel

Excel has a group of functions that help you to calculate dates. For example, the number of days between two dates or the date on which an invoice will be payable.

This is the second in my series of lessons where I demonstrate how to enter and calculate dates and times in Excel. Here is the link to part one.

Excel Tip List

Excel DVD Tips

The date functions that I demonstrate on this video are:

  • TODAY()
  • NOW()
  • DATE()
  • DATEVALUE()
  • WORKDAY()
  • NETWORKDAYS()
  • EOMONTH()

The last three date functions require you to activate the Analysis ToolPak Add-in. You will also learn some valuable and time saving keyboard shortcuts.

You can watch this video in High Definition, Full Screen Mode on my YouTube Channel – DannyRocksExcels

Learn how to “Master Excel in Minutes – Not Months!”

Share and Enjoy:
  • Add to favorites
  • Facebook
  • Twitter
  • Technorati
  • Print
  • email
  • Digg
  • StumbleUpon
  • del.icio.us
  • Yahoo! Buzz
  • Google Bookmarks
  • Orkut
  • SphereIt
  • Sphinn