How to Create Hyperlinks in Excel

Hyperlink Dialog Box in ExcelOne of my viewers – Ben from the UK – wrote to tell me that he needs to learn how to create Hyperlinks in Excel in preparation for a job interview this week. He asked me that, since he could not find a decent YouTube video on this topic, to create a tutorial demonstrating ow to create Hyperlinks in Excel.

Hey, in these tough economic times, I am happy to help as many people as I can. However, given my time constraints – and, my need to make a living from my video resources – I invite you to purchase one or more of my many resources on my secure online shopping website – http://shop.thecompanyrocks.com

Topics Covered in this Excel Video Tutorial

In this video tutorial, I demonstrate how to:

  • Create a simple Hyperlink to another worksheet in your Excel workbook
  • Create Hyperlinks that “Return you” to your main “Dashboard” worksheet
  • Hyperlink to other programs – e.g. PowerPoint
  • Create hyperlinks that direct a viewer to send you an E-Mail message
  • Hyperlinks to websites

I am the first to admit that the Insert / Edit Hyperlinks Dialog Box is confusing and “too busy” for my tastes. However, in this video tutorial, I demonstrate how to navigate through this Dialog Box and also, how to get te most out of it. For example, how to change the “text displayed” for the Hyperlink while working in the Dialog Box.

Watch  this Video in High Definition

Click here – on this Hyperlink – to watch this video in High Definition on my YouTube Channel – DannyRocksExcels

View this Totorial Now!

Purchase My Resources to improve your Excel Skills

If you are in a similar situation as Ben – where you need to demonstrate specific knowledge of MS Office Programs Skills – why trust your luck? Rather, improve your skills – and your odds for securing a new job or a promotion!

I invite you to purchase one or more of my down-to-earth video tutorials. Visit my secure online shopping website – http://shop.thecompanyrocks.com

Share and Enjoy:
  • Add to favorites
  • Facebook
  • Twitter
  • Technorati
  • Print
  • email
  • Digg
  • StumbleUpon
  • del.icio.us
  • Yahoo! Buzz
  • Google Bookmarks
  • Orkut
  • SphereIt
  • Sphinn

Microsoft Access – A Quick Video Tour of my DVD, The 50 Best Tips for Access 2007

Microsoft Access and Microsoft Excel work together seamlessly. However, they are VERY DIFFERENT programs. It is very easy to exchange data between the two programs. But there is a world of difference when in it comes to storing, entering, and analyzing data in each program.

Recently, a number of my viewers have asked me how to create Data Forms in Excel. In almost every case, they want a simple answer – one that does not require them to learn VBA – Visual Basic for Applications. My considered response is that Access is the best way to collect and relate data via Forms. And then, use Excel to analyze the information that you collect from those data forms.

Here is a short – 6 1/2 minutes –  video tour of my DVD-ROM, “The 50 Best Tips for Access 2007.” If you have never used Microsoft Access, this video will give you an idea of how it works. If you have tried to use Access, but gave up in frustration, I am confident that my video tutorials will help you to get over the learning curve so that you can use Access to its full potential!

Nine Categories of  Video Tutorials for Access 2007

On my DVD-ROM, I have organized the 50 Video Tips into nine categories of lessons:

  1. Getting Started with Access 2007 – 9 Videos. Perfect introduction for new users of Access as well as a quick guide the the changes and additions in Access 2007 and Access 2010.
  2. Working with Tables in Access 2007 – 5 Videos. Tables are the essential building blocks in Access. Learn how to create many focused Tables and then create relationships between them.
  3. Using Filters & Queries in Access 2007 – 8 Videos. Filters are “temporary” or one-time questions. Queries are “saved” or “named” questions about the information in your database.
  4. Running Action Queries in Access  2007 – 4 Videos. Action queries allow you to quickly make changes to the data in Access. You can update, or delete records; append records or make a new table from a query.
  5. Working with Access 2007 Forms – 9 Videos. Forms are very easy to create in Excel. Use forms to enter data or to view your data – one record at a time. Gather data via Forms in Access and then export this data to analyze in Excel.
  6. Working with External Data in Access 2007 – 4 Videos. Did you know that you can use Access to semi-automatically update your Microsoft Outlook contact information? Learn how to integrate the programs in the MS Office Suite.
  7. Working with Access 2007 Reports – 5 Videos. Reports are designed for printing and distributing the summarized information in you Access database. Learn how to create a mailing label report for your next direct mail campaign!
  8. Managing Access 2007 Databases – 3 Videos. Learn how easy it is to back up your database. You can even “split” a larger database into smaller, more focused databases.
  9. Automating Access 2007 – 3 Videos. Learn how to use Macros and Command Buttons that allow less-experienced end-users enter and output the information in your Access database.

Table of Contents for “The 50 Best Tips for Access 2007.”

Click here to see specific data – including run times – for each of the 50 video lessons on my DVD-ROM.

Purchase my DVD-ROM – “The 50 Best Tips for Access 2007”

To learn more about my DVD-ROM, I invite you to visit my secure online shopping website – http://shop.thecompanyrocks.com I guarantee your satisfaction 100%. If you are not satisfied with any of my products, you may return them – without questions – at any time!

Watch Video in High Definition

Follow this link to watch this video lesson in High Definition – on my YouTube Channel, DannyRocksExcels


Share and Enjoy:
  • Add to favorites
  • Facebook
  • Twitter
  • Technorati
  • Print
  • email
  • Digg
  • StumbleUpon
  • del.icio.us
  • Yahoo! Buzz
  • Google Bookmarks
  • Orkut
  • SphereIt
  • Sphinn

How to Embed a PowerPoint Presentation on Your Blog or Website

I am really excited about the capabilities of the new WebApps available for Excel, Word and PowerPoint. While I have been using my Sky Drive on http://www.office.live.com for the past few months, I have just started to “embed” my Excel Workbooks and PowerPoint Presentations here on my website.

How to Embed PowerPoint Presentations on Website or Blog

As you will learn in the video tutorial, you need to follow these steps:

  1. Upload your PowerPoint Presentation to your Sky Drive via Windows Live! – www.office.live.com
  2. Set the properties for “Sharing” this presentation – e.g. View by All.
  3. Select the Presentation on your SkyDrive to open it online.
  4. Select the Title Bar for the Presentation to take you to the “Sharing Options” for the Presentation.
  5. When you select “Embed”, you will see a frame that hold the HTML Coding that you can copy. Copy this HTML Code.
  6. On your Blog or Website, open the HTML Editor for your new posting. Paste the HTML Code that you copied from your Sky Drive.

It is really easy!

Click on My Embedded PowerPoint Presentation

Here is my embedded presentation. You can advance the slides here on my website. You can also click the icon in the lower righ- hand corner to view the Presentation in full screen mode using your Internet Browser.

View This Video Tutorial in High Definition

Follow this link to watch this video tutorial in High Definition on my YouTube Channel – DannyRocksExcels

Share and Enjoy:
  • Add to favorites
  • Facebook
  • Twitter
  • Technorati
  • Print
  • email
  • Digg
  • StumbleUpon
  • del.icio.us
  • Yahoo! Buzz
  • Google Bookmarks
  • Orkut
  • SphereIt
  • Sphinn

Download My Excel Workbooks and Step-by-Step Instructional Manuals for Free!

Finally! I have figured out a way to allow my viewers to download the Excel Workbooks, Word Documents, PowerPoint Presentations, etc. that I use in my video lessons. For the past few months, I have been able to give you a direct link to download the Adobe Acrobat files that I create. For example:

My problem has been that – Starting in Office 2007 –  the underlying file structure of each program (Excel, Word, PowerPoint, etc.) has changed and it is no longer possible to “Publish to the Web” the worksheets, documents and presentations that I offered in the past. I will spare you the boring details of why and how this has happened, because I have good news for you!

Enter, “The Cloud!”

Cloud Computing

You have probably seen or heard this advertising slogan recently. Here is how I have just discovered how “The Cloud” can work for both you and me:

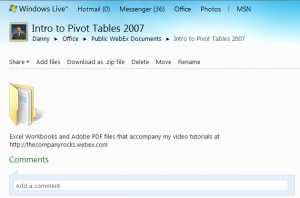
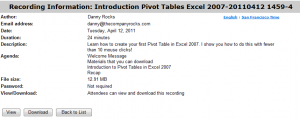
Initially, I am uploading – and sharing – the workbooks, documents, PDFs, etc. that accompany the extended video recordings that I offer on my http://thecompanyrocks.webex.com site.

This is a new development for me and The Company Rocks. I offer a series of extended length ( 25 minute to 60 minutes) video tutorials.

  • Intro to Pivot Tables in Excel 2007

    Information about this Video Recording


  • As I write this posting, I have 4 modules – each offered “free of charge” – for you to view and / or download.
  •  
  •  

Go to http://thecompanyrocks.webex.com to see what I currently offer you!

  • As I gather feedback, activity, statistics, etc. I may extend the range of downloadable content that I create – My decision will depend upon your feedback, so please add your comments below in this posting!
  • My Next Level of Product Offerings 

    I am on a journey to evolve the range and detail of the products and services that I offer you, my loyal viewers and subscribers. I wnat to be responsive to your needs. So, that meanrs that the more feedback that I get from you – my viewers and subscribers – the better I can structure my offerings. I welcome your feedback!

    Based on some great feedback from my viewers and subscribers, I have just begun to create a series of extended length ( 25 to 45 minutes) video tutorials. The initial tutorials will be offered “free of charge.” Other video tutorials will be carry a modest – I might add, aggressive – pricing model! My goal is to give you the product and content that you need at a price that is mutually acceptable! You, and your level of supposrt will tell me what is acceptable – please give me your feedback!

    Extended Video Tutorials Now Online

    You can now view or download – after registering – at WebEx by Cisco – for these video tutorials that I have posted:


    I hope that you find these links and videos helpful. Please add your feeback via the comments section below this post.

    Sincerely,

    Danny Rocks

    www.thecompanyrocks.com
    Share and Enjoy:
    • Add to favorites
    • Facebook
    • Twitter
    • Technorati
    • Print
    • email
    • Digg
    • StumbleUpon
    • del.icio.us
    • Yahoo! Buzz
    • Google Bookmarks
    • Orkut
    • SphereIt
    • Sphinn

    How to Import Excel Data Into Access

    This is the first in a series of lessons where I demonstrate how to integrate Excel data with an Access database. In this lesson you will learn how to:

    • Access Working with External Data

      Work with External Data

    • Import an Excel worksheet as a new Table in Access.
    • Append an Excel worksheet to the Table that we created with the Imported data.
    • Create a link between the Source Excel worksheet and an Access Table.
    • Refresh the link between Excel and Access.

    First, on the Excel side of this process, make sure that you have clearly identified the Field Headers in the Top Row of your data set. If you have and cells that contain Formulas, convert the formulas to Cell Values.

    Begin the Import Process

    You initiate the Importing from inside Access. Go to the External Data tab on the Ribbon (in Access 2007) and choose Excel. Follow the steps in the Import Wizard. I recommend that you allow Access to create a Primary Key for the new table. This will allow you to set up “table relationships”  inside Access.

    Append Excel Data to an Existing Access Table

    Once you have at least one Access Table set up, you have another option when you Import Excel data – you can “Append” Excel data to the Access Table. Be sure that your “field headers” match each other. Once again, follow the steps in the Import Excel data Wizard.

    Notice that with each of these Import Wizards you are given the option to save your Import definition. If you will be importing data from the same Excel source on a regular basis, this “Saved Definition” will save you a lot of time.

    Link to Source Data

    You can decide to establish a “link” to the source data – in this case an Excel worksheet. If you do, you will see a special “icon” next to your Access table that indicates that the table is linked to an Excel source. In this case, you can not make any changes to the tabel from inside Access. You make all changes – adding, editing and deleting records – from inside Excel.

    With a link to the source data, remember to “refresh” the link to see the updated information.

    Watch this Video Lesson – Embedded from YouTube

    As an experiment, I am embedding this video as a YouTube Video. Click on the video and you will be watching it in High Definition, Full Screen mode on my YouTube Channel – DannyRocksExcels.

    Share and Enjoy:
    • Add to favorites
    • Facebook
    • Twitter
    • Technorati
    • Print
    • email
    • Digg
    • StumbleUpon
    • del.icio.us
    • Yahoo! Buzz
    • Google Bookmarks
    • Orkut
    • SphereIt
    • Sphinn

    Posting a Series of Tips for Access 2007

    50 Best Tips for Access

    Access Tips on DVD

    By customer request, I am going to start posting a series of Video Lessons offering tips for using Microsoft Access 2007.

    Initially, I am going to focus on showing your how to integrate Access with other Office Programs (Excel and Outlook).  Depending on the response I receive from you, my viewers, I will go deeper into the program to show you how to get the most out of a Relational Database System – MS Access.

    As you can see from this beautiful cover, I have published “The 50 Best Tips for Access 2007”on DVD-ROM. This image is the “Dashboard Menu” for the DVD-ROM. You just click on the category and the DVD opens up the sub-menu for the specific lessons covered in that section.

    You can learn more about the contents of my DVD-ROM by:

    Thank you!

    Danny Rocks

    The Company Rocks

    Share and Enjoy:
    • Add to favorites
    • Facebook
    • Twitter
    • Technorati
    • Print
    • email
    • Digg
    • StumbleUpon
    • del.icio.us
    • Yahoo! Buzz
    • Google Bookmarks
    • Orkut
    • SphereIt
    • Sphinn

    My Most Viewed and Downloaded Videos for Excel and PowerPoint

    My iTunes Podcast

    Danny on iTunes

    I began to post my videos as podcasts at the iTunes store this past summer. Since then, my video lessons for Excel and PowerPoint have been viewed and downloaded many times. I am thirlled. And, I thank you for your support and encouragement.

    Here are the links – on my website – to the most popular video episodes. I have organized them by category in the order of their popularity. You can click on any link to view or download that video from my website. Or, you can go to my video Podcast by clicking on this link – “Danny Rocks Tips and Timesavers” Podcast on iTunes.

    Merging and Consolidating Excel Worksheets

     PowerPoint Presentations

    Data Visualizations

    What-If Analysis in Excel

    Importing Data From Other Programs

    Pivot Tables

    Excel Tables

    Social Media

    Formula Errors

    Please add your comments below – or on my iTunes Channel. I welcome your feedback.

    You can learn how to “Master Excel in Minutes – Not Months!”

    Sincerely,

    Danny Rocks

    Share and Enjoy:
    • Add to favorites
    • Facebook
    • Twitter
    • Technorati
    • Print
    • email
    • Digg
    • StumbleUpon
    • del.icio.us
    • Yahoo! Buzz
    • Google Bookmarks
    • Orkut
    • SphereIt
    • Sphinn

    How to Efficiently Select Data in MS Office Programs

    Before you can copy data in Excel, you must first select the cells with the data you wish to “copy and paste.” Before you can apply formatting in MS Word, you must first select the word, the sentence, the pararagraph, or the document that you wish to format. So let me demonstrate my tips for efficiently selecting data in any MS Office Program.

    Selecting Data in Excel

    • To select data that is contiguous (adjacent cells) in Excel, hold down the SHIFT key and use the directional arrow keys to “draw” your selection.
    • To select data that is non-contiguous (non-adjacent cells), make your 1st selection and then hold down the CTRL key as you make additional selections.
    • You can use CTRL + SHIFT + Directional Arrow to quickly select all of the cells that contain data in a contiguous direction.
    • Use the keyboard shortcut CTRL + A to select all of the cells with data in a Data Set.
    • Watch this video for additional Excel tips for selecting data.

    Selecting Data in Word

    • Double-click a word to select it.
    • Hold down the CTRL Key as you click to select the entire sentence.
    • Triple-click to select the entire paragraph,
    • Use the keyboard combination CTRL+ SHIFT + Directional Arrow to select entire words moving in that direction.
    • Use the F8 key to enter “Selectiion Mode.” As you continue to press the F* key, you will cycle to select a Word, a Sentence, a paragraph, the complete document.

    I guarantee that you will save time and become more efficient when you use these tips to quickly select data in any MS Office Program.

    Follow this link to watch this video in High Definition Full Screen Mode on YouTube.

    Learn how to “Master Excel in Minutes – Not Months!”

    Share and Enjoy:
    • Add to favorites
    • Facebook
    • Twitter
    • Technorati
    • Print
    • email
    • Digg
    • StumbleUpon
    • del.icio.us
    • Yahoo! Buzz
    • Google Bookmarks
    • Orkut
    • SphereIt
    • Sphinn

    How to Display Numbers During a PowerPoint Presentation

    How many presentations do you “sleep through” – where the presenter displays slide after slide packed with numbers? Probably more that you wish – unless you need to catch up on your sleep!

    Numbers are powerful – they help to support your point of view; they help to make your case. But, don’t overwhelm your audience with numbers, numbers, numbers. Don’t make the assumption that “the numbers speak for themselves.” If they do, then why do we need to hire you to advance the slides? Just send the numbers to us. Or… include them in your handout.

    If you are going to “present” numbers, you need to direct the discussion of those numbers so that the audience can see and understand the trends that you are pointing out. One effective way to do so is to use Custom Animation in PowerPoint to introduce one chart series at a time.

    Watch this short 5 minute video as I share my best practice tips for displaying financial numbers during a PowerPoint Presentation.

    Bonus: You can read – and download – the article that I published on this topic. Click here to read “Five Tips for Displaying Numbers During a PowerPoint Presentation” on www.exinearticles.com

    Share and Enjoy:
    • Add to favorites
    • Facebook
    • Twitter
    • Technorati
    • Print
    • email
    • Digg
    • StumbleUpon
    • del.icio.us
    • Yahoo! Buzz
    • Google Bookmarks
    • Orkut
    • SphereIt
    • Sphinn

    How to Share Excel Data with Word Documents

    Microsoft Excel is tightly integrated with MS Word. There are several ways to share data that you create in Excel with a Word Document. In this lesson I demonstrate how to copy part of an Excel worksheet and then paste it into a Word document. Here are the techniques that I cover in this short Excel Video Lesson:

    • Paste as a Word Table
    • Paste as a Picture
    • Paste Special as a different type of Picture
    • Paste a Link between the Excel and Word documents – to update the latest sales figures

    This is the first in a series of videos where I demonstrate how easy it is to share information between the different programs in the Microsoft Office Suite.

    You can see a list of “The 50 Best Tips for Word 2007” by following this link.

    You can view and download this video – for free – at the iTunes Store. I invite you to subscribe to my podcast, “Danny Rocks Tips and Timesavers.”

    Learn how to “Master Excel in Minutes – Not Months!”

    Share and Enjoy:
    • Add to favorites
    • Facebook
    • Twitter
    • Technorati
    • Print
    • email
    • Digg
    • StumbleUpon
    • del.icio.us
    • Yahoo! Buzz
    • Google Bookmarks
    • Orkut
    • SphereIt
    • Sphinn