How to Quickly Clear All Text Formatting from PowerPoint Slides

Control Slide Formatting

Use SlideMaster to Control Formatting

One of my clients inherited a “Ransom Note” PowerPoint Presentation. I think that you can visualize what a “Ransom Note” slide looks like: Multiple Fonts at various sizes with multiple colors and effects thrown in for good measure! Ugly and, certainly, not professional.

Steps to Clear All Text Formatting

In my video tutorial, I demonstrate:

  • How to work in PowerPoint’s Outline View
  • How to use Keyboard Shortcuts to expand and collapse the text for each slide
  • How to clear all of the text formatting

Use the SlideMaster to Set Default Settings for Text

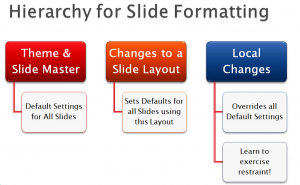
In my experience, most of the people who use PowerPoint are either unaware of the SlideMaster or they do not know how to use it. In my tutorial, I demonstrate how Microsoft Office Themes and the SlideMaster work together to set the default setting for formatting your presentation.

Minimize Local Formatting

My goal, in creating this tutorial, is to impress upon you the importance of limiting your use of “local formatting.” The reason that “ransom note” formatting survives is a direct result of applying local formatting rather than using the SlideMaster to help you to maintain a consistent look.

Additional Resources for Learning PowerPoint

I am the author of the best-selling DVD-ROM, “The 50 Best Tips for PowerPoint 2007.Click on this link to learn more about the 7 1/2 hours of focused video training that I offer on my DVD-ROM.

Watch My Tutorial in High Definition

Follow this link to view my tutorial in High Definition on my YouTube Channel – DannyRocksExcels


Share and Enjoy:
  • Add to favorites
  • Facebook
  • Twitter
  • Technorati
  • Print
  • email
  • Digg
  • StumbleUpon
  • del.icio.us
  • Yahoo! Buzz
  • Google Bookmarks
  • Orkut
  • SphereIt
  • Sphinn

How to Embed a PowerPoint Presentation on Your Blog or Website

I am really excited about the capabilities of the new WebApps available for Excel, Word and PowerPoint. While I have been using my Sky Drive on http://www.office.live.com for the past few months, I have just started to “embed” my Excel Workbooks and PowerPoint Presentations here on my website.

How to Embed PowerPoint Presentations on Website or Blog

As you will learn in the video tutorial, you need to follow these steps:

  1. Upload your PowerPoint Presentation to your Sky Drive via Windows Live! – www.office.live.com
  2. Set the properties for “Sharing” this presentation – e.g. View by All.
  3. Select the Presentation on your SkyDrive to open it online.
  4. Select the Title Bar for the Presentation to take you to the “Sharing Options” for the Presentation.
  5. When you select “Embed”, you will see a frame that hold the HTML Coding that you can copy. Copy this HTML Code.
  6. On your Blog or Website, open the HTML Editor for your new posting. Paste the HTML Code that you copied from your Sky Drive.

It is really easy!

Click on My Embedded PowerPoint Presentation

Here is my embedded presentation. You can advance the slides here on my website. You can also click the icon in the lower righ- hand corner to view the Presentation in full screen mode using your Internet Browser.

View This Video Tutorial in High Definition

Follow this link to watch this video tutorial in High Definition on my YouTube Channel – DannyRocksExcels

Share and Enjoy:
  • Add to favorites
  • Facebook
  • Twitter
  • Technorati
  • Print
  • email
  • Digg
  • StumbleUpon
  • del.icio.us
  • Yahoo! Buzz
  • Google Bookmarks
  • Orkut
  • SphereIt
  • Sphinn

Making Effective Use of “White Space” on PowerPoint Slides

When you hear the term “White Space,” think “Breathing Room.”  As a nation, we tend to scan a document before making the decision to go back and read it – or delete it!.

When you are able to understand the strategic use of creating “white space”  on your PowerPoint Slides, you take the first step towards getting your audience to “pay attention” to what you have to say – to what you have to offer to them!

Use Paragraph Spacing to Make Bullet Points More Effective

In this video tutorial, I demonstrate how to effectively use “paragraph spacing” to make your bullet points more effective during your presentation – by effectively using “white space” between each bullet point.

Do NOT hit the “Enter” key repeatedly to add spacing between bullet points!

Rather, learn how to use the “Paragraph Spacing” dialog box to control the amount of space before and / or after each paragraph.

Each time that you press the ENTER key you create a new paragraph! So, effectively, each Bullet Point is a single paragraph!

Learn how to use this fact  strategiclally to create the message that you want to convey to your audience.

Watch – as I create “Before” and “After” slides to illustrate how creating more “white space” between your bullet points makes each point on the slide more effective.

One great Keyboard Shortcut to use as you fine-tune your paragraph spacing is the F4 key which repeats your last action. This is a powerful time-saver!

SmartArt Diagrams

Watch – as I show you how to convert a series of bullet points into a SmartArt Diagram to more effectively communicate your message to your audience. SmartArt Diagrams offer a welcome relief to an endles – or mindless – parade of bullet point ridden slides.  You can quickly convert a series of bullet points into a Smart Art Diagram as you will see on this video.

View this Video Tutorial In High Definition Mode

Click on this Link to view my video tutorial in High Definition on my YouTube Channel – DannyRocksPowerpoint

Share and Enjoy:
  • Add to favorites
  • Facebook
  • Twitter
  • Technorati
  • Print
  • email
  • Digg
  • StumbleUpon
  • del.icio.us
  • Yahoo! Buzz
  • Google Bookmarks
  • Orkut
  • SphereIt
  • Sphinn

Review of My DVD – The 50 Best Tips for PowerPoint

Here is a link to a review of my DVD, “The 50 Best Tips for PowerPoint 2007.”  The review is by PowerPoint MVP, Geetesh Bajaj on the Indezine website.

Indezine Website

Review of my PowerPoint DVD

If you have not yet visited the Indezine website, I encourage you to do so. There are numerous resources available that will help you to produce better slides and to deliver better presentations. You will also find:

  • Interviews with the leading members of the presentations community.
  • Hundreds of PowerPoint Templates.
  • A Blog with great articles to help you to improve your presentations.
  • Links to other websites devoted to presentations.

If you design or deliver presentations, please bookmark the www.indezine.com website.

Share and Enjoy:
  • Add to favorites
  • Facebook
  • Twitter
  • Technorati
  • Print
  • email
  • Digg
  • StumbleUpon
  • del.icio.us
  • Yahoo! Buzz
  • Google Bookmarks
  • Orkut
  • SphereIt
  • Sphinn

How Do You Respond When Equipment Fails During a Presentation?

Equipment will fail. Your Laptop will display the “Blue Screen of Death.” The Bulb in your Projector will suddenly “Pop!” You will:

  • Forget to pack your Power Cord
  • Bring the wrong PowerPoint Presentation
  • Trip over a Power Cord and …

It is not a question of IF; it is a question of WHEN. When your equipment fails, how will you respond? What will you do? How will you recover?

This question was posed on one of the LinkedIn Groups that I belong to – “Great Communicators! Effective Presenting & PowerPoint.” I posted my thoughts – including my own list of what to bring whenever I travel to make a presentation. Geetesh Bajaj, a Microsoft MVP for PowerPoint liked my response and he turned it into an article on his blog. Click here to read the article and to see my list of “essentials to pack” for your next presentation.

Prepare your presentation. Prepare yourself. Prepare your recovery from an equipment failure. Expect the unexpected!

Please let me know what you have done – or wish that you had done – when your equipment fails during a presentation or a training session. Feel free to share a “war story” or two about what happened to you or that you saw happen during a presentation.

This article is published by EzineArticles – Click here to read or download it.

Share and Enjoy:
  • Add to favorites
  • Facebook
  • Twitter
  • Technorati
  • Print
  • email
  • Digg
  • StumbleUpon
  • del.icio.us
  • Yahoo! Buzz
  • Google Bookmarks
  • Orkut
  • SphereIt
  • Sphinn

Using Social Media to Engage Customers

Social Media can help you to grow your business. In order to use social media successfully, it is helpful that you follow a proven process. The AIDA process has successfully guided direct mail marketers for years. It is a perfect match for helping you to get customers to click deeper into your website: to turn their curiosity into an action; to make a sale; to make an appointment.

To see how to apply AIDA (Attention, Interest, Desire, Action) to your internet marketing plan, click to watch – or download –  this short 5 minute video.

You can read and download this article – Published on EZineArticles

Follow this link to subscribe to my podcast – “Danny Rocks Tips and Timesavers” – at the iTunes store.

Share and Enjoy:
  • Add to favorites
  • Facebook
  • Twitter
  • Technorati
  • Print
  • email
  • Digg
  • StumbleUpon
  • del.icio.us
  • Yahoo! Buzz
  • Google Bookmarks
  • Orkut
  • SphereIt
  • Sphinn

Tools To Control Text On Slides

I want you to reduce the “Visual Clutter” on your PowerPoint Slides. You are not trying to write a “ransom note,” you are attempting to create a professional image.

PowerPoint has a great set of tools that you can use to enforce the Visual Style options that you set. In this video lesson, I demonstrate how to set up the style guides and then how to use PowerPoint’s tools to make the changes that conform to your rules.

Here are the steps to follow for this lesson:

  1. Go to the Tools Men and choose Options and then click the Spelling & Style Tab.
  2. On the Spelling & Style Tab choose Style Options.
  3. You can make your stylistic choices on the “Case & End Punctuation” tab and on the “Visual Clarity” tab. When you have made your choices, click OK.
  4. Back in Normal View, when you click in a Text Place holder, look for the Yellow Light Bulb. Click on it to see your options to conform to the style settings that you set.
  5. Also, look for the AutoFit Options Smart Tag. Choose the best option to change your style.

Search my Index of PowerPoint Video Lessons for the topic of your choice.

News! My DVD, “The 50 Best Tips for PowerPoint 2007” is availabe for purchase. Visit my online store for details.

Related Videos

Share and Enjoy:
  • Add to favorites
  • Facebook
  • Twitter
  • Technorati
  • Print
  • email
  • Digg
  • StumbleUpon
  • del.icio.us
  • Yahoo! Buzz
  • Google Bookmarks
  • Orkut
  • SphereIt
  • Sphinn

5 Ways to Import Excel Data into PowerPoint

MS Excel is the best application for organizing & calculating data. It is also the best choice for creating graphs of your data.

MS PowerPoint is the best application for communicating “the story” that you want your data to communicate.

Use  each application to do what it does best. And don’t waste time re-typing your Excel data into PowerPoint.

In this video lesson, I demonstrate 5 ways to import your Excel data into a PowerPoint presentation. 1) Paste it as Text only. 2) Paste it as a Picture. 3) Paste it as a Table. 4) Embed the entire Excel Workbook (OLE). 5) Paste Special to establish a “Link” to the Excel Source Data.

Here are the steps to follow in this video lesson:

  1. Select and copy the Excel Data to the clipboard.
  2. In PowerPoint select the slide for the data and choose “Paste.”
  3. Look at the bottom right corner of the “pasted data” and locate the “Paste Options” tag.
  4. Option #1 – Paste as Text Only. The data is pasted into a Text box that can me sized and moved.
  5. Option #2 – Paste a Picture of the Table – Can be sized and moved. The Picture Toolbar makes it easy to modify the background and borders of the table.
  6. Option #3 – Paste the data as a Table (Default option) – each entry fits into its own “cell” in the table. Easy to format the table to fit your needs.
  7. Option #4 – Paste the Entire Excel Workbook. This option actually “embeds” the Excel application – and increased the size of you file. You can double-click on the table and the MS Excel application is activated (OLE) so that you can e.g. modify functions and add fields. etc.
  8. Option #5 – This time you choose Edit – Paste Special – Link. Now, whenever you change the “source data” in Excel your PowerPoint slide will update to reflect the current information. Be careful to keep the Excel file in the same directory as your PowerPoint presentation file so that the “link” does not get lost when you move files to a USB drive or other location.

Find the PowerPoint Video Lesson that you want – Index to all PowerPoint Topics

News! My new DVD, “The 50 Best Tips for PowerPoint 2007” is available for purchase. Visit my online store for details.

Share and Enjoy:
  • Add to favorites
  • Facebook
  • Twitter
  • Technorati
  • Print
  • email
  • Digg
  • StumbleUpon
  • del.icio.us
  • Yahoo! Buzz
  • Google Bookmarks
  • Orkut
  • SphereIt
  • Sphinn

Watch My PowerPoint Video Lessons on YouTube

I have uploaded many of my PowerPoint Training Videos to YouTube. Here is the link to my YouTube Channel:

YouTube Logo

YouTube Logo

http://www.youtube.com/user/DannyRocksPowerPoint


YouTube reaches a very broad audience. It offers a very different experience. YouTube makes it very easy to share the videos that you like with your friends and colleagues. Check it out for yourself!

I must admit that I was wary about uploading my training videos to YouTube. However, I have had a very positive response to my MS Excel Videos on YouTube. So I have created a separate PowerPoint Channel and have begun to upload content from this website to YouTube.

If you want to share any of my Excel or PowerPoint Videos, YouTube make it easy to do so. You can even choose to embed the videos on your own website – go right ahead! I have included my business card at the beginning and the end of each video so that viewers know how to reach me.

Let me know what you think about YouTube. How is it different from this blog? Have you ever shared a video that you found on YouTube with your friends. Have you ever embedded a YouTube video on your own website?

I invite you to add your comments below.

News! My new DVD, “The 50 Best Tips for PowerPoint 2007” is available for purchase. Visit my online store for details.

Share and Enjoy:
  • Add to favorites
  • Facebook
  • Twitter
  • Technorati
  • Print
  • email
  • Digg
  • StumbleUpon
  • del.icio.us
  • Yahoo! Buzz
  • Google Bookmarks
  • Orkut
  • SphereIt
  • Sphinn

Work in Outline View in PowerPoint

MS PowerPoint’s Normal View has two Tabs – Slide View and Outline View.  In this video lesson, I will share tips for getting the most out of Outline View.

For example:

  • Collapse or Expand the text for individual Slides or for all Slides in the presentation.
  • Create a “Summary Slide” containing the titles for each slide in your presentation.
  • Insert Hyperlinks to text on your “Summary Slide” to make it easy to navigate to an individual slide.

Here are the steps to follow in this video lesson:

  • In Normal View, choose the Outline Tab.
  • Be sure that the Outlining Toolbar is active. (View – Toolbars – Outlining) You can either “dock it” or make it a “floating toolbar.”
  • Experiment with Expand and Collapse – Individual slides (Double-click or Expand on the toolbar) or All slides in the presentation.
  • Create a Duplicate Slide – The keyboard shortcut is Ctrl+D or choose Insert-Duplicate Slide.
  • To create a “Summary Slide” first select the slide icons for the slides you want. Then click the Summary Slide Icon on the Outlining Toolbar.
  • Create a “Hyperlink” to quickly navigate to individual slides. First select the text on the “Summary Slide” and then use the keyboard shortcut – Ctrl+K and choose “Place in this Document” and choose the slide.
  • You must be in Slide Show View in order to test your Hyperlink.

Find the PowerPoint Video Lesson that you want – Index to all PowerPoint Topics

News! My new DVD, “The 50 Best Tips for PowerPoint 2007” is available for purchase. Visit my online store for details.

Share and Enjoy:
  • Add to favorites
  • Facebook
  • Twitter
  • Technorati
  • Print
  • email
  • Digg
  • StumbleUpon
  • del.icio.us
  • Yahoo! Buzz
  • Google Bookmarks
  • Orkut
  • SphereIt
  • Sphinn