How to Create Hyperlinks in Excel

Hyperlink Dialog Box in ExcelOne of my viewers – Ben from the UK – wrote to tell me that he needs to learn how to create Hyperlinks in Excel in preparation for a job interview this week. He asked me that, since he could not find a decent YouTube video on this topic, to create a tutorial demonstrating ow to create Hyperlinks in Excel.

Hey, in these tough economic times, I am happy to help as many people as I can. However, given my time constraints – and, my need to make a living from my video resources – I invite you to purchase one or more of my many resources on my secure online shopping website – http://shop.thecompanyrocks.com

Topics Covered in this Excel Video Tutorial

In this video tutorial, I demonstrate how to:

  • Create a simple Hyperlink to another worksheet in your Excel workbook
  • Create Hyperlinks that “Return you” to your main “Dashboard” worksheet
  • Hyperlink to other programs – e.g. PowerPoint
  • Create hyperlinks that direct a viewer to send you an E-Mail message
  • Hyperlinks to websites

I am the first to admit that the Insert / Edit Hyperlinks Dialog Box is confusing and “too busy” for my tastes. However, in this video tutorial, I demonstrate how to navigate through this Dialog Box and also, how to get te most out of it. For example, how to change the “text displayed” for the Hyperlink while working in the Dialog Box.

Watch  this Video in High Definition

Click here – on this Hyperlink – to watch this video in High Definition on my YouTube Channel – DannyRocksExcels

View this Totorial Now!

Purchase My Resources to improve your Excel Skills

If you are in a similar situation as Ben – where you need to demonstrate specific knowledge of MS Office Programs Skills – why trust your luck? Rather, improve your skills – and your odds for securing a new job or a promotion!

I invite you to purchase one or more of my down-to-earth video tutorials. Visit my secure online shopping website – http://shop.thecompanyrocks.com

Share and Enjoy:
  • Add to favorites
  • Facebook
  • Twitter
  • Technorati
  • Print
  • email
  • Digg
  • StumbleUpon
  • del.icio.us
  • Yahoo! Buzz
  • Google Bookmarks
  • Orkut
  • SphereIt
  • Sphinn

How to Roll Up a Summary by Month to Filter an Excel Pivot Table

Filter Using a Roll Up by Month Summary

Filter with a Roll Up by Month Summary

In this Excel tutorial, I respond to a viewer request. He likes the new “Roll Up Summary by Month” feature for filtering a field in an Excel 2007 – 2010 Field. What he finds frustrating – there seems to be no natural way to accomplish this with an Excel Pivot Table.

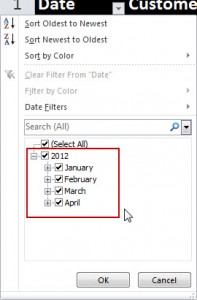
Natural Language Date Filters in Excel

Before I solve my readers dilemma, I demonstrate how to take advantage of the new “Natural Language” Date Filters that were introduced in Excel 2007. Date Filters allow you to filter records from “Today,” “Last Week,” “Next Month,” etc. They are available for Excel Tables and Excel Pivot Tables. These “Natural Language” Date Filters are a major improvement in Excel!

Group a Field for Pivot Tables

To solve my viewers question, I “Grouped” the original Date Field in his Pivot Table to produce “virtual” fields for “Month,” and “Year.” Now, it is a simple step to filter the “virtual” Month Field to obtain a “roll up” filter for individual months in the Pivot Table. Just select a single cell in the Pivot Table Date Field and choose Group Field. Make your choices in the Grouping Dialog Box and you are “good to go!”

I also show you how to take advantage of the Expand and Collapse Field Commands in a Pivot Table.

In-Depth Video Tutorial for Excel Pivot Tables

At my secure, online shopping website, you can purchase my 90-minute Video tutorial for Excel Pivot Tables. Available for immediate downloading or on a DVD-ROM. Version specific editions for Excel 2003, 2007, and 2010.

Watch Video Tutorial in High Definition

Follow this link to watch this tutorial in High Definition Mode on my YouTube Channel – DannyRocksExcels


Share and Enjoy:
  • Add to favorites
  • Facebook
  • Twitter
  • Technorati
  • Print
  • email
  • Digg
  • StumbleUpon
  • del.icio.us
  • Yahoo! Buzz
  • Google Bookmarks
  • Orkut
  • SphereIt
  • Sphinn

How to Create a Pivot Table Year-to-Year Comparison Report

One of my viewers asked for my help in creating and Excel Pivot Table Report. She wants to compare the total number of units shipped during three time periods: the years 2008, 2009 and 2010. The trick to producing this report is to drag the field to be summarized – Units Shipped – to the Values Area three times. Then, you change the Value Field Settings to first Sum the Units, then to compare the change in units year-over-year and finally to express this as a percentage of change. This creates a Year-to-Year Comparison Report.

This is a tip that is best demonstrated visually. So, I invite you to watch this 6 minute and 55 second Excel Video Training Lesson.

If you do not have the time to watch the video now, you can use my RSS Feed to deliver it to your computer or you can subscribe to my Video Podcast on iTunes to watch it later.

Learn how to “Quickly Create Pivot Table Reports and Charts”

Share and Enjoy:
  • Add to favorites
  • Facebook
  • Twitter
  • Technorati
  • Print
  • email
  • Digg
  • StumbleUpon
  • del.icio.us
  • Yahoo! Buzz
  • Google Bookmarks
  • Orkut
  • SphereIt
  • Sphinn

View My Excel Training Videos on YouTube

DannyRocksExcels on YouTube

YouTube

Two years ago, in August 2010, I started uploading my Excel video training lessons to my YouTube Channel – DannyRocksExcels. Now there are 93 Excel videos available. I was originally reluctant to post my video content on YouTube because I selfishly wanted to restrict my videos to my own website. After a conversation with a colleague, I changed my mind and began to upload all of my Excel videos to YouTube.
Why?
  • YouTube attracts a much more diverse audience than I could ever hope to attract on this website.
  • YouTube makes it easy to download and share my videos with others.
  • YouTube has a great analytics program – Insight – that allows me to gain valuable information about my audience.
  • YouTube is now showing several of my most popular videos as ads automatically (via Google AdSense)
  • I have good interaction with my viewers on YouTube – comments, requests for new videos, etc.

When I look at the numbers on YouTube I am amazed!

Here is a summary:

  • My Excel Videos have been viewed almost 200,000 times over the past two years.
  • One Video (Introduction to Pivot Tables) has been viewed over 20,000 times!
  • My DannyRocksExcels Channel on YouTube now has over 500 subscribers.

I invite you to view, download or subscribe to my YouTube Channel for Excel Training videos by following this link.

Thank you!

Danny Rocks

P.S. Learn how to “Master Excel in Minutes – Not Months!”

Share and Enjoy:
  • Add to favorites
  • Facebook
  • Twitter
  • Technorati
  • Print
  • email
  • Digg
  • StumbleUpon
  • del.icio.us
  • Yahoo! Buzz
  • Google Bookmarks
  • Orkut
  • SphereIt
  • Sphinn

How to Import Text and Database Files in Excel 2007

When you need to import a Word document or an Access database file in Excel, resist the temptation to simply “open” the file with Office Button (File) – Open. Rather, follow the steps to “Get External Data” from the Data Tab on the Ribbon. This is how you can control the data type of each field that you import – especially important for formatting fields that contain dates. You also can control – and preview – who Excel will distribute the data into individual columns before you import the file.

Watch as I demonstrate these steps – this tip will save you a lot of time and avoid frustration.

(Note: This is a re-posting so that I can feed this video lesson to my Podcast at the iTunes store.)

Follow this link to view or subscribe to the “Danny Rocks Tips and Timesavers” podcast at the iTunes store.

Learn how to “Master Excel in Minutes – Not Months!”

Share and Enjoy:
  • Add to favorites
  • Facebook
  • Twitter
  • Technorati
  • Print
  • email
  • Digg
  • StumbleUpon
  • del.icio.us
  • Yahoo! Buzz
  • Google Bookmarks
  • Orkut
  • SphereIt
  • Sphinn

View Excel Worksheets Side by Side

This is another Excel 2007 Video Lesson that I created in response to a view’s request for help. Excel 2007 makes it quite easy to view two worksheets “side by side,” but there are a couple of “got’cha steps” to be aware of in order to make this work for you.

First, I want to clarify the difference between three similar words that I use in this lesson – “Windows, Workbooks, Worksheets.” We will be opening up multiple Windows in order to compare multiple Worksheets which can be part of one or more Workbooks. “Windows, Workbooks, Worksheets” – Oh My!

It is easier to show you the difference, so let’s view this lesson.

If you enjoyed this Excel Video Lesson, you will enjoy my DVD, “The 50 Best Tips for Excel 2007.” You can purchase it here on my website at my secure storefront. Click here to start shopping!

You can watch this Excel Video Lesson on YouTube – Visit my channel, DannyRocksExcels

Related Excel Video Lessons:

Click here to see a Listing of “The 50 Best Tips for Excel 2007”

Share and Enjoy:
  • Add to favorites
  • Facebook
  • Twitter
  • Technorati
  • Print
  • email
  • Digg
  • StumbleUpon
  • del.icio.us
  • Yahoo! Buzz
  • Google Bookmarks
  • Orkut
  • SphereIt
  • Sphinn

How to Use Excel’s Transpose and Text to Columns Tools to Reorganize Your Data

This video lesson is in response to a viewer’s request. The information that he gets comes from a mainframe computer and the orientation of the data is horizontal (going left-to-right across columns. He wants to be able to reorganize this data to show it vertically (from top-to-bottom in rows. I use Excel’s Transpose tool to show him how to do this.

I also demonstrate an extremely useful Excel Tool – Text to Columns – to break apart an address block (City, State, Postal Code) into discrete fields – to help you to manage a mail merge or to sort and filter by State or by Postal Code.

(Note: Somehow this lesson “got lost” as I was reorganizing my website. So, I apologize in advance if you already viewed this lesson.)

If you enjoyed this lesson, I invite you to visit my online bookstore to shop for my DVD, “The 50 Best Tips for Excel 2007.” It is on sale now!

You can watch this Excel Video Lesson on YouTube – vist my channel – DannyRocksExcels

Related Videos

Share and Enjoy:
  • Add to favorites
  • Facebook
  • Twitter
  • Technorati
  • Print
  • email
  • Digg
  • StumbleUpon
  • del.icio.us
  • Yahoo! Buzz
  • Google Bookmarks
  • Orkut
  • SphereIt
  • Sphinn

Get External Data in Excel 2007

I created this Excel Video Lesson in response to a viewer request. He wants to learn how to move files that contain dates, text and numbers from a different program into Excel. Excel 2007 gives you an easy to follow Wizard from the Data Tab of the Ribbon to Get External Data.

As I stress in this lesson – “Resist, resist, resist … the urge to go to the Office Button (File Menu) and choose Open. No, no , no… Use the Get External Data Wizard. Watch this short lesson to see how to bring information in from Word 2007 and from Access 2007. I also show you how to save an Excel 2007 file as a Text File (.txt) to make it easy to open it in almost any program.

If you enjoyed this lesson, I invite you to shop for my DVD, “The 50 Best Tips for Excel 2007.”The Store for The Company Rocks is a secure shopping site. And, I personally guarantee your satisfaction – or I will refund your purchase price! Click here to start shopping.

You can watch this Excel Training video on my YouTube Channel – DannyRocksExcels

Related Videos

Share and Enjoy:
  • Add to favorites
  • Facebook
  • Twitter
  • Technorati
  • Print
  • email
  • Digg
  • StumbleUpon
  • del.icio.us
  • Yahoo! Buzz
  • Google Bookmarks
  • Orkut
  • SphereIt
  • Sphinn

Build an Accounts Receivable Aging Report

Here is another request for help from a viewer. How to create a report that shows “the aging” of past due invoices (1 – 30 days past due, etc.).

Here are the Functions that I use in this report:

  • =IF()
  • =AND()
  • =WEEKDAY()

Looking for a specific Excel video? Take advantage of my Index of Excel Video Lessons to find the video that you want to watch.

Related Videos

You can watch this Excel Video Lesson on YouTube

Invitation to Visit My Online Shopping Site

Want to learn the best Tips for Excel? You can purchase my DVD, “The 50 Best Tips, Tricks & Techniques for Excel 2007

I use a secure shopping cart at http://shop.thecompanyrocks.com – I invite you to pay a visit today!

Click here to see a Listing of “The 50 Best Tips for Excel 2007”

Share and Enjoy:
  • Add to favorites
  • Facebook
  • Twitter
  • Technorati
  • Print
  • email
  • Digg
  • StumbleUpon
  • del.icio.us
  • Yahoo! Buzz
  • Google Bookmarks
  • Orkut
  • SphereIt
  • Sphinn

Calculate the Days Worked on a Project

Do you manage Projects? Do you create Project work schedules? Do you need to know how many days were actually worked on your Project?

If so, this Excel video lesson is for you. A viewer asked for my help. He did not want to use MS Project for his work schedules. Rather, he wants to know which Excel Functions to use for his Project work schedules.

Excel Functions Covered in this Tutorial

In this lesson, I demonstrate how to use two functions included in the Excel “Analysis Tool-Pak”:

  • =WORKDAY()
  • =NETWORKDAYS()

Index of Excel Video Tutorials

Search for a specific Excel Video Lesson on this website in my Index.

Watch Excel Tutorial on YouTube

Click on this link to watch this Excel Tutorial on my YouTube Channel – DannyRocksExcels

Secure Online Shopping for My Resources

Want to learn how to get the most out of Excel 2007?

My DVD, “The 50 Best Tips, Tricks & Techniques for Excel 2007” is available for purchase.


Share and Enjoy:
  • Add to favorites
  • Facebook
  • Twitter
  • Technorati
  • Print
  • email
  • Digg
  • StumbleUpon
  • del.icio.us
  • Yahoo! Buzz
  • Google Bookmarks
  • Orkut
  • SphereIt
  • Sphinn