The 10 Most Watched Excel YouTube Videos for September 2012

My YouTube Channel – DannyRocksExcels – had 141,586 individual views during the month of September 2012:

Here is a list – with Hyperlinks – to the 10 Most Watched Excel Videos

Top 10 YouTube Excel Videos

  1. Compare Two Excel Lists to Spot the Differences– 5,304 views in September
    1. Go to this Blog Post on my website
  2. How to Merge Multiple Excel Workbooks to a Master Budget – 4,915 views in September
    1. Go to this Blog Post on my website
  3. How to Use Advanced Filters in Excel– 4,660 views in September
    1. Go to this Blog Post on my website
  4. How to Add a Check Box Control to an Excel Form– 4,301 views in September
    1. Go to this Blog Post on my website
  5. Use the Built-in Data Form in Excel to View and Filter Records– 3,948 views in September
    1. Go to this Blog Post on my website
  6. How to Create a Summary Report from an Excel Table-3,932 views in September
    1. Go to this Blog Post on my website
  7. How to Create an Interactive Excel Pivot Chart– 3,696 views in September
    1. Go to this Blog Post on my website
  8. Consolidating Data from Multiple Excel Worksheets by Position– 3,618 views in September
    1. Go to this Blog Post on my website
  9. How to Use the Solver Tool in Excel– 3,532 views in September
    1. Go to this Blog Post on my website
  10. How to Use an Excel Data Table for “What-if” Analysis– 3,513 views in September
    1. Go to this Blog Post on my website

Thanks to my 4,500 Subscriber on YouTube!

I extend my heartfelt thanks to my many loyal viewers and subscribers to my Excel video tutorials. Your feedback and requests for solutions have formed the foundation for my Excel Training Videos.

9 Essential Excel 2010 Skills

9 Essential Excel 2010 Skills

Learn More About my Extended Length Excel Video Training Resources

I have created a series of Extended Length Video Training Resources in the category of “Master Excel in Minutes.” I invite you to follow this link to learn more about my new series of videos.

Share and Enjoy:
  • Add to favorites
  • Facebook
  • Twitter
  • Technorati
  • Print
  • email
  • Digg
  • StumbleUpon
  • del.icio.us
  • Yahoo! Buzz
  • Google Bookmarks
  • Orkut
  • SphereIt
  • Sphinn

How to Add Summary Information for Excel Workbook Properties

Almost everyone has experienced the frustration of being unable to locate an Excel Workbook on their computer. You can’t remember the name or the location of the Workbook. You waste valuable time searching in vain.

Tags for Document Search

Tags for Document Search

One way to minimize this frustration is to add Excel Workbook Properties that Summarize the content and purpose of the document. By adding Tags, Keywords, Client Names or Project Titles in the Properties Summary you make it easier for your computer to Index and Find your documents.

Fortunately, beginning with Microsoft Office 2007, it is a lot easier to add these properties to an Excel Workbook. In this video tutorial, I show you how to do this.

Displaying Recent Documents

Did you know that you can display up to 50 Recent Documents? Even better, you can “Pin” important documents so that they remain on the list. This is a valuable tool when you need to access important files, for example, once a month! I show you how to do this on the video.

Shop for Additional Resources

I invite you to visit my secure online shopping website – http://shop.thecompanyrocks.com – where you can purchase all of the training materials that I have developed.

Watch Video in High Definition

Click on this link to watch my Excel Tutorial in High Definition on my YouTube Channel – DannyRocksExcels

Watch this Video Now


Share and Enjoy:
  • Add to favorites
  • Facebook
  • Twitter
  • Technorati
  • Print
  • email
  • Digg
  • StumbleUpon
  • del.icio.us
  • Yahoo! Buzz
  • Google Bookmarks
  • Orkut
  • SphereIt
  • Sphinn

How to Protect Cells that Hold Formulas in Excel

Protect Cells w Formulas

Protect Excel Formula Cells

Learning how to Protect the Excel Worksheet Cells that contain Formulas is a three-step process. This process tends to confuse and frustrate many Excel users. Some of the steps seem counter-intuitive when you first begin the process. That is why I created this video tutorial – To demonstrate each of the steps; to remove the confusion.

First, I show you how this is done in Excel 2010 / Excel 2007. Next, I show you how to protect the Formula Cells in Excel 2003.

Key Concept for Protecting Formula Cells

By default, all cells in an Excel Workbook are “Locked!”

So, if you are going to allow a user to input current values in the worksheet, you must first “select” the input cells and then, “Unlock” them.

Protecting Excel Worksheet

The final step in the process is to Protect the Worksheet. I rarely use a password for the worksheet because I tend to forget it and then I cannot even access the protected worksheet!

Take care in the Protect Sheet Dialog Box to select only the options that best suit your purpose. For example, in this video tutorial, I choose to limit users to select only the cells that I unlocked in steps 1 and 2.

Go To Special Dialog Box

The quickest way to select the cells that you wish to “unlock” is to open the Go To Special Dialog Box. There, choose “Constants.” You can limit the constants to “Numbers” as I do in this tutorial.

Danny Rocks Tips and Timesavers Podcast on iTunes

I invite you to subscribe to my “free” video podcast on iTunes. Click on this link to access all of my Podcast Videos.

Watch Tutorial in High Definition

Follow this link to view this Excel Tutorial in High Definition on my YouTube Channel – DannyRocksExcels


Share and Enjoy:
  • Add to favorites
  • Facebook
  • Twitter
  • Technorati
  • Print
  • email
  • Digg
  • StumbleUpon
  • del.icio.us
  • Yahoo! Buzz
  • Google Bookmarks
  • Orkut
  • SphereIt
  • Sphinn

How to Create Custom Views of a Worksheet in Excel

Custom Views in Excel

Custom Excel Views

This is Part 2 in my series of video tutorials demonstrating the Commands found on the View Tab of the Excel Ribbon. Building on the concepts that I demonstrated in Part 1 (“How to Freeze Row and Column Labels While Scrolling in Excel”), I now show you how to save these settings as a Custom View.

Create a Custom View in Excel

  1. Display the settings that you wish to save as a Custom View – e.g. Changing the ZOOM Level of Magnification, Freezing Rows or Columns, etc.
  2. From the View Tab on the Ribbon, choose the Custom Views Command.
  3. In Custom Views Dialog Box, click Add; Give your View a Name and Click OK.
  4. Remember to Save your Excel Workbook. To test your custom view, I recommend that you revert to your normal or default view and save that version. Then close the workbook and reopen it. Now, it will display the last view displayed when you saved the workbook. Click on the Custom Views Command and select the Custom View that you recently added; the Custom Settings will now display.
  5. Add – and Save – additional Custom Views.

Custom Views are Worksheet Level Views

When you create a Custom View, it only applies to the Excel Worksheet where you created it. In fact, while you “Show” a Custom View, all other Worksheets in the Active Workbook are NOT available.

Excel Tables and Custom Views

 There is one “gotcha” with Custom Views. If you have formatted a data set as an Excel Table on ANY worksheet in the workbook, ALL Custom Views are blocked out. Watch  this video to see how to “work around” this roadblock.

Online Shopping at The Company Rocks

I invite you to visit my secure online shopping website – http://shop.thecompanyrocks.com – to preview all of the resources that I offer you.

Watch Tutorial in High Definition

Follow this link to view this Excel Tutorial in High Definition on my YouTube Channel – DannyRocksExcels

Play Video Now


Share and Enjoy:
  • Add to favorites
  • Facebook
  • Twitter
  • Technorati
  • Print
  • email
  • Digg
  • StumbleUpon
  • del.icio.us
  • Yahoo! Buzz
  • Google Bookmarks
  • Orkut
  • SphereIt
  • Sphinn

Summarizing Employee Hours Worked and Vacation Time over 52 Weeks in Excel

Sum Across Worksheets

Sum Across Worksheets

This is the third episode in my series of Excel Tutorials where I share my best practices for creating an Excel Workbook that contains 52 weeks of Employee Time Cards. In this lesson, I focus on techniques to Summarize – or Consolidate – the hours worked or taken as vacation, by each employee, over a period of several weeks.

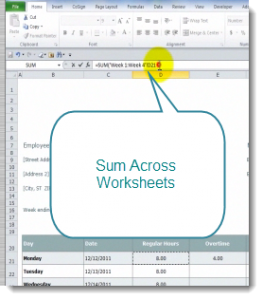
Sum Across Worksheets

This is a great tip to learn! In my experience, I find that very few experienced users of Excel know that you can do this! This will eliminate the hassle of linking to a cell in individual worksheets to create your formula. There is, after all, a limit to the number of characters that you are allowed in a formula!

Consolidate Data By Position

Since each worksheet in this workbook is identical in structure, Data Consolidation is simple. Provided, that is, that you remember to “Add” each worksheet range reference in the Dialog Box. In this example, I have “created a link” to each worksheet so that the data can be easily updated.

Links to Other Tutorials in this Series

Shop for Additional Resources

I invite you to visit my new, secure online shopping website – http://shop.thecompanyrocks.com – where you can preview all of the resources that I offer you.

Watch Tutorial in High Definition

Follow this link to view this Excel Tutorial in High Definition on my YouTube Channel – DannyRocksExcels

Share and Enjoy:
  • Add to favorites
  • Facebook
  • Twitter
  • Technorati
  • Print
  • email
  • Digg
  • StumbleUpon
  • del.icio.us
  • Yahoo! Buzz
  • Google Bookmarks
  • Orkut
  • SphereIt
  • Sphinn

How to Use Keyboard Shortcuts in Excel to Control Basic File Operations

Excel 2007 File Operations

Excel 2007 File Operations

If you have recently upgraded to either Excel 2007 or Excel 2010, you REALLY NEED to master the Keyboard Shortcuts that I present in this lesson!

Many Excel veterans who upgrade, tell me that they initially felt “lost” with the new user interface. Some of my clients called me in a panic because they didn’t know where to look to Print their work or to open a document. If you know how to use the Keyboard Shortcuts that I present in this lesson, you will never be at a loss. As an added bonus, these Keyboard Shortcuts work with ALL Microsoft Office programs and also for most Windows-based programs.

The “N-O-W-S” Keyboard Shortcuts

I use this acronym – NOWS – to remember the keyboard shortcuts to Open, Close and Save Documents in MS Office programs. Use Ctrl + W to Close the active worksheet.

In this video tutorial, I also show you when NOT to use Keyboard Shortcuts! There are many times when you need to access the full file menu selection.

Keyboard Shortcut for Print Preview

Use Ctrl + F2 to open up the Print Preview pane. Use the “Esc” key to Exit Print Preview.

Download My Chart of Popular Keyboard Shortcuts as a PDF

Follow this link to go to the web page where I store my Keyboard Shortcut Charts and other download-able content.

These Keyboard Shortcuts work for all versions of Excel. So far, I have found only one Keyboard Shortcut that is different when used in Excel 2007 / 2010 than in Excel 2003.

More Video Tutorials for Keyboard Shortcuts

This is the first in a series of video tutorials that I have planned. Each video will focus on the Keyboard Shortcuts you can use to perform a specific task – e.g. Formatting Cells, Inserting and Deleting, etc. My plan is to post one new video in this series per week.

Watch Video Tutorial in High Definition Mode

Follow this link to view this video tutorial in High Definition on my YouTube Channel – DannyRocksExcels


Share and Enjoy:
  • Add to favorites
  • Facebook
  • Twitter
  • Technorati
  • Print
  • email
  • Digg
  • StumbleUpon
  • del.icio.us
  • Yahoo! Buzz
  • Google Bookmarks
  • Orkut
  • SphereIt
  • Sphinn

How to Customize the Quick Access Toolbar in Excel 2007

Quick Access Toolbar Office 2007

QUick Access Toolbar in Office 2007

Learning how to Customize the Quick Access Toolbar (QAT) in Excel 2007 or Excel 2010 is a great way to ease the “learning curve” when you upgrade versions.

In my experience, I have found that most people do not even realize that there is a Toolbar in Excel 2007, let alone that you can move it to a different location and to customize it!

What I Cover in this Video Tutorial

Here is what you will learn from this YouTube Video Tutorial:

  • To move the QAT to Show it Below the Ribbon (recommended!)
  • To add the most popular command buttons one at a time
  • To open the Customize Quick Access Toolbar Dialog Box
  • To find commands to add – including Command Not in the Ribbon!
  • To organize the commands on your QAT
  • To create a customized QAT for “specific workbooks”  – great for special projects!
  • To quickly add individual command buttons with a right-click of the mours
  • To add entire command button groups to the QAT with a right-click of the mouse – (recommended!)

Since this video is a little longer than usual, I am making it available exclusively on my YouTube Channel.

Watch Video in High Definition Mode

Follow this Link to view this tutorial in High Definition on my YouTube Channel – DannyRocksExcels

“The 50 Best Tips for Excel 2007” DVD-ROM

Purchase my DVD-ROM, “The 50 Best Tips for Excel 2007” – on sale now at http://shop.thecompanyrocks.com for only $29.97 USD!

Share and Enjoy:
  • Add to favorites
  • Facebook
  • Twitter
  • Technorati
  • Print
  • email
  • Digg
  • StumbleUpon
  • del.icio.us
  • Yahoo! Buzz
  • Google Bookmarks
  • Orkut
  • SphereIt
  • Sphinn

Write an Excel Macro in VBA to Update Worksheet Tab Name

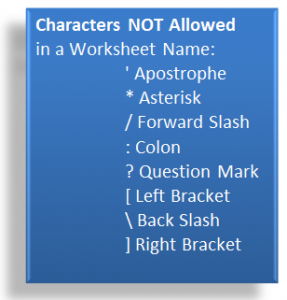
Characters Not Allowed in Worksheet Names

Characters Not Allowed in Worksheet Names

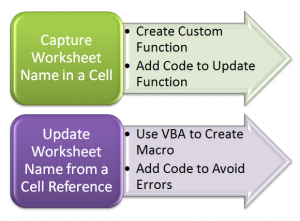
This is Part 2 of my two-part series of video tutorials where I demonstrate how to link an Excel Worksheet Tab Name and the contents of a Worksheet Cell.

In this lesson, I show you how to write an Excel Macro in VBA (Visual Basic for Applications) that will update the name of the Worksheet Tab based on the value of a cell in that worksheet.

Write Excel Macro in VBA

For this Macro, the first line of code will prevent the Macro from crashing if the cell contains one of the “disallowed” characters that you see in the diagram

On Error Resume Next

The second line of code initiates a “For – Next” loop of instruction

For Each ws In Thisworkbook.Worksheets

The third line of code is the Instruction to follow in the “For – Next” Loop

ws.Name = Left(ws.Cells(1,5).Value, 31)

Here, this instruction is saying – in plain English – “Nane this Worksheet (ws) using the leftmost 31 characters in the cell that is in the 1st row of the 5th column – (Cell E1)”

The reason for including 31, is that that is the maximum number of characters allowed in an Excel Worksheet Tab Name.

The fourth and fifth lines of code complete the macro – watch the video to see what they are (What a “tease” I am!!)

Run Macro from Command Button

In this lesson I also show you how to run this Macro from a command button that I add to the Quick Access Toolbar in Excel 2007 or Excel 2010.

Watch Video in High Definition on YouTube

 Click on this link to watch this Excel Video Tutorial in High Definition on my YouTube Channel – DannyRocksExcels

Source for This Code

I found the code for this example in one of Bill Jelen, Mr. Excel’s Books, “Excel Gurus Gone Wild.”

Bill’s website is: http://www.mrexcel.com/

Watch Part 1 of this Series

Here is the link to Part 1 of this series. I show you how to write a Custom Excel Function to insert the Name of the Worksheet Tab into a cell on the worksheet.

Share and Enjoy:
  • Add to favorites
  • Facebook
  • Twitter
  • Technorati
  • Print
  • email
  • Digg
  • StumbleUpon
  • del.icio.us
  • Yahoo! Buzz
  • Google Bookmarks
  • Orkut
  • SphereIt
  • Sphinn

Write a Custom Excel Function to Link Worksheet Tab Name to a Cell

Custom Functions in Excel

Custom Excel Functions

In response to many viewer requests, I am creating a two-part series of video tutorials that show you how to create links between the name of an Excel Worksheet Tab and a cell on that worksheet.

Here, in Part One, I demonstrate how to write a Custom Excel Function to capture the name of the worksheet tab in a cell.

Write Custom Excel Functions

You write Custom Excel Functions in the Visual Basic Editor. One way to open the Visual Basic Editor is to use the keyboard shortcut Alt + F11. Here are the elements that I use in this lesson:

  • Open the Project Explorer Pane (Keyboard Shortcut Ctrl + R).
  • Insert a Module to contain the VBA Code that you write for your Custom Function
  • Open the Code Pane (Keyboard Shortcut F7).

Write the Code for the Custom Function

In its simplest form, this is all of the code that you need for this Custom Excel Function:

Function SHEETNAME2() As String
SHEETNAME2 = Application.Caller. Parent.Name
End Function


That’s it!

Automatically Update Results of Custom Functions

A major difference between Custom Functions that you write and Excel’s Built-in Functions is that by default, the result of a Custom Function does not automatically update when values or references change. If you want your Custom Function to automatically update whenever the worksheet changes, add this line of code to your Custom Function in the Module:

Application.Volatile True

Source for this Code

I found the code for this Custom Excel Function in John Walkenbach’s Book, “Excel 2007 Formulas. He is an Excel Expert and I admire his writing style. You can check out his reources at this site:

http://spreadsheetpage.com/

Watch this Video in High Definition on YouTube

Click on this link to view this Excel Tutorial on my YouTube Channel – DannyRocksExcels.

Watch Part 2 of This Series

Here is the link to Part 2 in this Series. In this lesson I show you how to write an Excel Macro in VBA to update the Name of the Worksheet Tab based upon the value in a cell on the worksheet.

Share and Enjoy:
  • Add to favorites
  • Facebook
  • Twitter
  • Technorati
  • Print
  • email
  • Digg
  • StumbleUpon
  • del.icio.us
  • Yahoo! Buzz
  • Google Bookmarks
  • Orkut
  • SphereIt
  • Sphinn

How to Create Custom Headers and Footers for Printing Excel Worksheets

How many times have you wasted time and paper when printing out an Excel Worksheet? Did you:

  • Forget to include the page numbers in the footer of each printed page?
  • Forget to repeat the column titles for the second and succeeding pages?
  • End up with “orphaned” columns that are disconnected from the main worksheet?
Headers and Footers in Excel

Headers and Footers in Excel

And the list goes on and on and …

Most Excel users, in my experience, spend very little time “previewing” their Excel worksheet prior to printing it – and wasting time and money. And also leaving a poor professional image in the minds of their clients and colleagues. 

Don’t let this happen to you!

Page Layout View

Page Layout View is a “working” view that was introduced in Excel 2007. I spend most of this video tutorial showing you how to get the most out of Page Layout View, including the placeholders for Header and Footer Elements. Personally, I spend a considerable amount of time when I am creating a new worksheet working in Page Layout View. Here, unlike in earlier versions of Excel, you can see how adding an additional column or two will effect the printed page. You can also verify that you company logo and other elements are properly positioned – while you are working inside the worksheet! For me, this view is indispensable!

Watch Video in High Definition on YouTube

This Excel Video Tutorial is a little longer than usual – 10 minutes and 14 seconds – and it contains more graphic images than usual. So, rather than embed this as an MP4 Video, I have decided to provide the link to this video on my YouTube Channel – DannyRocksExcels. Here is the link:

 http://youtu.be/X_Pb0KNFYak?hd=1

I produced this in High Definition, Full Screen Video Mode. This video is best watched on YouTube in High Definition. Let me know what you think.

Master Excel in Minutes – Not Months!

Learn how you can quickly learn how to get the most out of Excel – in the least amount of time! Click here to find out how!

Share and Enjoy:
  • Add to favorites
  • Facebook
  • Twitter
  • Technorati
  • Print
  • email
  • Digg
  • StumbleUpon
  • del.icio.us
  • Yahoo! Buzz
  • Google Bookmarks
  • Orkut
  • SphereIt
  • Sphinn