How to Dynamically Color-Code Dates with Conditional Formatting in Excel

Conditional Formatting for Dates

Conditional Formatting for Dates

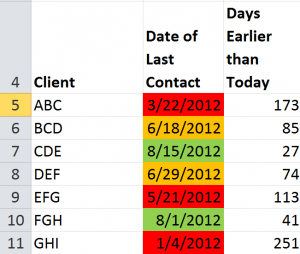
One of my viewers wants to learn how to “dynamically” color-code cells that contain dates. She is monitoring the frequency of contact with her clients and she wants Excel to automatically apply:

  • One background color to cells where it has been less than 60 days since last contact
  • A different color when the time frame is between 60 and 90 days
  • A third color when it has been over 90 days since the last contact with a client

Here, I demonstrate how she can do this using Conditional Formatting Rules. However, this will only work if you are using Excel 2007 or Excel 2010.

Understanding Dynamic Date Functions

In order to make this visualization “dynamic,” I make references to cells that contain the =TODAY() Function. This is a “volatile” function that updates automatically based upon the date in your computer system’s clock. I use this to classify the last date of contact with her clients.

Improvements in Conditional Formatting

Beginning with Excel 2007, you can now apply multiple rules that use formulas. Remember that when you use a formula, it must evaluate as “TRUE” in order to apply the formatting that you specify.

Formulas Used to Apply Conditional Formatting

Conditional Formatting Rules

Rules for Conditional Formatting

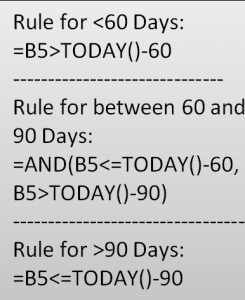
To make it easier for you to practice this skill, I have posted this table that details the formulas that I used for each of the three rules in my video tutorial.Note that with the middle condition, I use the =AND() Function. All logical tests must answer TRUE for the AND() Function to return TRUE.

It will take a little bit of practice for you to become comfortable with these formulas. As a Best Practice, I recommend that you create a table of formulas so that you can see how a “tweak” in your formula can turn a FALSE answer into a TRUE answer.

Related Video

Follow this link to Part Two in this Series. I demonstrate how to “toggle” Conditional Formatting On or Off by using a Check Box Control in Excel.

Watch this Video in High Definition

Follow this link to watch my Excel Tutorial in High Definition on my YouTube Channel – DannyRocksExcels

Get the Best Tips and Training for Excel

Click on this link to learn more about my best-selling DVD-ROM, “The 50 Best Tips for Excel 2007.” This link will take you to my secure online shopping website –  http://shop.thecompanyrocks.com

Subscribe to my Video Podcast on iTunes

Here is the link to go to my free Video Podcast, “Danny Rocks Tips and Timesavers” on iTunes.


How to Use Criteria in Excel Functions and Filters

Criteria for Advanced Filter

Criteria for Advanced Filter

When you apply a Filter to an Excel data set, you use Criteria. In a filter, only the records that can answer “TRUE” to the criteria that you set will appear. The records that answer “FALSE” are hidden while the filter remains in place.

Logical Functions

The IF(), AND() and OR() Functions belong to a group of Logical Functions. In their function arguments, they evaluate a “Logical Test” and can perform one action is the answer is “TRUE” and a different action if “FALSE.” 

  • The AND() Function – each of the Logical Tests must be met in order to return the answer “TRUE.”
  • The OR() Function – if any condition is met, the answer that is returned is “TRUE.”
  • I frequently “Nest” an AND() Function or an OR() Function inside an IF() Function to test multiple criteria.

Advanced Filters in Excel

While many Excel users are familiar with Filtering, in my experience, I find that many people get confused when it comes to using Advanced Filters. In this video tutorial, I try to eliminate this confusion. Watch and you will learn how to:

  • Write Criteria for Advanced Filters using “AND” criteria and “OR” Criteria.
  • Copy the “Filtered Records” to another location
  • Use the Keyboard Shortcut Ctrl + Shift + L to quickly “toggle” normal filter drop-down menus on or off.


Watch Tutorial in High Definition

Follow this link to watch this Excel Tutorial in High Defintion on my YouTube Channel – DannyRocksExcels

Create a Custom Excel Function to Replace Formulas with Multiple IF Functions

Multiple Nested IF Functions

Multiple Nested IF Functions

Do you get tied up in a knot trying to write – let alone explain – a formula that has one IF Function nested inside another, and another…? I know that I do! And, what happens when your sales manager wants to revise the tiers for the quantity discounts? How many hours will this take you to review your logic and to make all of those multiple changes?

Usually, this will mean a lot of time, a lot of frustration and possibly some resentment thrown in as well!

Well, relax. I am going to demonstrate how easy it is to write a custom function in Excel using the “Select Case” Construct to replace the “rat’s nest” of multiple IF Functions in your formulas!

Scenario for this Function

You have been asked by your Sales Manager to write a formula to grant a discount, based upon the quantity of units ordered. There are 5 Tiers: Below 5 units ordered, no discount. From 6 to 24 units, a 10% discount, etc. Rather than spending a half hour nesting IF() functions and using AND() functions to create this formula, spend less than 10 minutes creating a Custom Excel Function instead.

Create the Custom Excel Function

  • Begin by opening the Visual Basic Editor. One way to do this is right-click any worksheet tab and select “View Code.”
  • Ensure that you have inserted a Module in the Project Explorer and that you have selected the module.
  • In the example that I use on this video tutorial, my first line of code is: “Function DiscQty(quantity)” and this is matched to an “End Function” statement
  • For this Custom Function, I am using the “Select Case” Construct in Visual Basic (VBA). Think of the keyword “Case” as a substitute for the =IF() Function.
  •  Rather than nesting the Excel =AND() Function inside the IF() Function, you will substitute – e.g. “Case 6 To 24” and then “DiscQty = 0.1” to indicate a 10% discount for quantities between 6 AND 24.

Watch the video to see how easy is is to create – and use – this custom Excel function. Invest the 7 minutes and 47 seconds to watch it – I guarantee that this investment of time will pay you many dividends for years and years to come!

View This Video Tutorial in High Definition

Follow this link to watch this Excel Video Tutorial in High Definition on my YouTube Channel – DannyRocksExcels.