Learn How Excel Stores and Formats Dates

Formatting Options for Dates in Excel

Multiple Formatting Options for Dates in Excel

In my experience, a high percentage of Excel users run into problems when working with Dates – and Times! In fact, I estimate that, during the past two weeks, I received 25 questions from viewers – they were asking for my help when working with Dates in their Excel workbooks.

Here, in this tutorial, I gathered together the most common problems that my viewers asked me help them to solve.. Gaining a firm understanding of how Excel Stores and Formats Dates is an Essential Skill that you must master!

Dates Stored as Serial Number

Dates are stored as a serial number in Excel. For example, if you type the number 1 into a blank cell and then change the formatting to a Short Date, you will see 1/1/1900 displayed. This is the date on which Excel began to keep track of time.  Dates that are entered correctly align to the right side of the cell.

Concepts Covered in this Tutorial

  • Use the =TODAY() Function – this date will automatically update.
  • Use the Keyboard Shortcut Ctrl + ; (semi-colon) to “Date Stamp” a cell – this is a static date.
  • Change the Formatting of a Date to e”General” – this reveals the actual serial number that Excel stores for the Date.
  • Apply Custom Date Codes to format cells that contain Dates.
  • Learn why it is essential that you always enter years using four digit codes – to avoid “the Century Break.”
  • Learn how to clear all formatting from cells before pasting or entering data. in them
  • Use the Text-to-Columns Wizard to convert “unfriendly” Date Text Labels to “usable” Numeric Date Values .
  • Tips for copying and pasting a range of cells formatted as USA Short Dates to a customized “European” Date Format.

Visit My Secure Online Shopping Website

I invite you to stop by my secure online shopping website – http://shop.thecompanyrocks.com – to take a look at all of th many training resources that I offer to you.

Watch Video in High Definition

Follow this link to watch my Excel Tutorial in High Definition on my YouTube Channel – DannyRocksExcels

How to Clear Cell Formatting In Excel

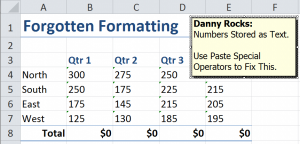
Numbers Stored as Text

Numbers Stored as Text

In my previous tutorial, I demonstrated how to clear all text formatting from all slides in a PowerPoint Presentation. Several viewers contacted me about publishing a tutorial that demonstrates how to clear formatting from ranges of cells in Excel.

Use the Clear Formatting Command

From my experience, I had found that a great many Excel users expect that formatting as well as contents are cleared when you press the Delete Key. This is not the case. The Delete Key only clears the contents of the cells in the selected range.

Use the Clear Formatting Command in the Editing Group on the Home Tab of the Ribbon. If you are using Excel 2003 or earlier, you will find this on the Edit Menu.

Numbers Stored as Text

As a Best Practice, I strongly recommend that you verify that the numeric values that you will be using in formulas are truly numbers and not numbers stored as text. This, unfortunately is a common case whenever you are working with data that has been imported from a main frame computer or other external sources. In this lesson, I demonstrate how to use Paste Special Operators to quickly convert numbers stored as text to true numeric values.

9 Essential Skills for Excel 2010

9 Essential Skills for Excel 2010 Video Tutorial

Nine Essential Skills for Excel

I cover, in-depth,  Entering and formatting data as well as using Paste Special Options on my new video resource, “Nine Essential Skills for Excel.”

  • Four hours of video training
  • 25 individual video tutorials
  • Step-by-Step Instructional Guide
  • Excel Practice Files included

Download It or Order My DVD-ROM

Watch My Tutorial in High Definition

Follow this link to watch my Excel Tutorial in High Definition on my YouTube Channel – DannyRocksExcels
How to Clear All Underlying Cell Formatting in Excel

Clear Underlying Formatting

Clear Underlying Formatting

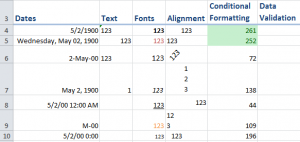
Have you ever typed data or a formula in a cell only to be surprised by the result? For example, you type in a number and then, unexpectedly,  Excel displays a Date or a Time in that cell. This happens frequently when you reuse an older Excel Worksheet of if you start working on a worksheet that a colleague or client has sent you.

Why does this happen?

Clear All Underlying Cell Formatting

In my experience, I have found that many Excel users mistakenly think that pressing the DELETE Key will “erase” the cells in the selection. No, No, No. The Delete key only erased the cell content – the data, text or formulas entered or pasted into the cell(s). The Delete key does NOT remove the Underlying Cell Formatting!

In this tutorial, I demonstrate how to remove the underlying cell formatting while leaving the cell Contents in place.

Topics Covered in this Tutorial

  • Using the Clear Formatting Command
  • Adding the Clear Command to your Quick Access Toolbar
  • Using Go To Special to Find and Select all cell that use either Conditional Formatting or Data Validation
  • Finding the Last Cell in your worksheet – you may be surprised to find a “remote cell” is NOT Blank!

View All the Resources that I Offer

I invite you to visit my secure online shopping website – http://shop.thecompanyrocks.com – to preview all of the resources that I offer.

Watch this Tutorial in High Definition

Follow this link to view this Excel Tutorial in High Definition on my YouTube Channel – DannyRocksExcels

 

How to Distinguish Cell Content from Cell Formatting in Excel

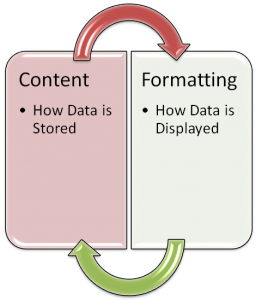
Cell Content vs Cell Formatting

Cell Content vs. Cell Formatting

Many Excel Users are surprised to discover that the Delete Key does not clear the formatting for the selected cell or range of cells. This can cause some unusual “surprises” you you or one of your colleagues later uses this “Deleted” Cell Range!

On the other hand, some cells must be formatted properly in order to return the correct result. This is especially true for cells that contain Time and Date Calculations. For example, in order to properly calculate a Sum of Hours that exceeds 24 hours, you need to apply the Custom Format [h]:mm to the formula cell.

Topics Taught in this Tutorial

  • Adding the Clear Command to the Quick Access Toolbar (QAT).
  • Using Go To Special – Last Cell, to find the last cell in the worksheet that contains either content or formatting – or both!
  • Understanding how Excel Stores Dates (as a Serial Number) and Times (as a Decimal Number) vs. How you use Cell Formatting to make Dates & Times easier to understand.
  • Using Keyboard Shortcuts to add the Current Date – Ctrl + ; (semi-colon) or Current Time -Ctrl + Shift + : (colon), or to “Toggle” between Formulas and Displayed Results  -Ctrl + ~ tilde).

Visit My New, Secure Online Shopping Website

Stop by http://shop.thecompanyrocks.com to see the new products that I have created. You can also download – for FREE – my Chart of Popular Excel Keyboard Shortcuts when you visit.

Watch Tutorial in High Definition

Follow this link to view this Excel Tutorial in High Definition on my YouTube Channel – DannyRocksExcels
YouTube Tutorial for this Post

How to Use Excel Keyboard Shortcuts to Cut, Copy and Paste Formulas and Formatting

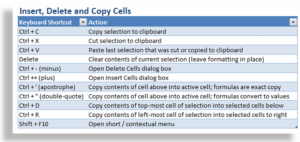
Keyboard Shortcuts for Cut, Copy & Paste

Keyboard Shortcuts for Cut, Copy & Paste

In addition to showing you the Keyboard Shortcuts to Cut, Copy and Paste in Excel, I demonstrate how these actions affect formulas and formatting.

Topics in this Tutorial

Here are the topics that I demonstrate in this video tutorial:

  • Select multiple cells using the keyboard
  • Use Ctrl + Enter to update all cells in the selection
  • Use Ctrl + ~ to “toggle” between showing and hiding formulas in all cells
  • Use F2 to edit in the cell – and to diagram cell references for formulas
  • Use Ctrl + C to copy the “relative cell references” in a formula
  • Use Ctrl + X to cut an Excel formula that retains the original cell references
  • Open and use the Office Clipboard to store up to 24 most recent copy and cut items
  • Use Ctrl + Z to undo multiple actions
  • Use Ctrl + A to select all cells in a contiguous range
  • Use the Delete key to delete the contents of a cell or range while retaining the formatting
  • Use the Clear All command to remove both formatting and contents in a range of cells

Download My Complete Charts of Popular Keyboard Shortcuts

Follow this link to my Excelusive Membership Content Page where you can download all of my charts and tables of Keyboard Shortcuts.

Watch Video in High Definition

Follow this link to view this tutorial in High Definition on my YouTube Channel – DannyRocksExcels