My Best Practice Tips for Importing External Data Into Excel

I created this Excel Training Video after helping a viewer who was having difficulty getting the correct results in his Pivot Table. The problem, it turned out, was not with the Pivot Table. Rather, it was with the way his underlying data was stored and formatted.

When to Store Numbers as Text Values

Get External Data From Commands

External Data Commands

Specifically, he had combined the records from multiple workbooks into a master table. The data came from multiple main-frame computers. However, in some workbooks he had the “Invoice Number” stored as a “Numeric” value while in other workbooks it was stored – properly – as a”Text” value. Excel will treat Invoice Number 678910 stored as a number differently from the same entry (678910) stored as a text value.

Here is the “rule of thumb” to follow: Unless you will be using the SUM, AVERAGE, PRODUCT, MIN or MAX functions in a field, store numbers as “TEXT Values.” A short list includes fields for telephone number, postal codes, customer numbers and invoice numbers.

Start with the Correct Data

When you Import External Data Into Excel, start off on the right footing. Import the fields that contain Invoice Numbers, Postal Codes and Telephone numbers as “Text” values. In my experience, I have found that trying to format these fields “after the fact” does not give me the results that I was looking for. Getting the External Data fields correctly formatted at the Import Data step is the key to producing accurate and informative Excel reports.

“The 50 Best Tips for Excel 2007” DVD-ROM

Secure Shopping Cart

This is one of the 50 Video Lessons that I offer on my DVD-ROM, “The 50 Best Tips for Excel 2007.” Click here to open a Secure Shopping Cart to purchase this DVD today. I guarantee your satisfaction. I will refund your purchase price if you are not 100% satisfied with my products.

Watch in High Definition mode on YouTube

Follow this link to watch this Excel video at DannyRocksExcels on YouTube.

How to Use Date Functions and Date Formatting in Excel

In this lesson, I respond to two recent requests from viewers for help in Using DATE Functions in Excel and also, how to apply Custom Date Formatting. I get similar requests on a frequent basis from both viewers and clients.

Solve Problem #1 

My first viewer wants help in using the DATE() Function in Excel. She wants to calculate a date that is 90 days after the starting date for a project. She encountered two problems

  1. Initially, the DATE() Function produced and error – because she forgot to ‘nest” the YEAR(), MONTH()+9, DAY() Functions inside the DATE() Function.
  2. She was not expecting a date to be filled in the formulas column when there was no starting date for the project – She needed to include an IF() function to perform a LOGICAL TEST – Does  the Starting Date = 0, Value if TURE, ” ” (to display nothing), Value if FALSE – to perform the calculation.
Excel Custom Date Formats

Excel Custom Date Formats

Solve Problem #2

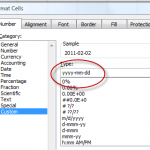
My second viewer wanted my help to ensure that the date values that he “pasted” into a range of cells were in the (Custom) format of “yyyy-mm-dd” (Year, Month, Date).

In this case, we need to take two steps:

  1. Format the destination cells using the CUSTOM FORMAT of yyyy-mm-dd that we create.
  2. After “Pasting” the Copied Cells, use the “Paste Options” dialog box to select – “Match Destination Formatting.”

I also demonstrate how to use the NETWORKDAYS() Function and the WORKDAY() Function – with an optional list of “Holidays” to exclude. And, finally, I show you the “pitfalls” that occur when you import a “text” file of dates that use a variety of formats. In order to perform DATE calculations, a date must be stored as a NUMBER in Excel. It must be right-aligned in the cell.

You can watch this Excel Video Lesson in High Definition, Full Screen Mode on my YouTube Channel – DannyRocksExcel – by clicking this link.

Learn to “Master Excel in Minutes – Not Months!”

How to Import Text and Database Files in Excel 2007

When you need to import a Word document or an Access database file in Excel, resist the temptation to simply “open” the file with Office Button (File) – Open. Rather, follow the steps to “Get External Data” from the Data Tab on the Ribbon. This is how you can control the data type of each field that you import – especially important for formatting fields that contain dates. You also can control – and preview – who Excel will distribute the data into individual columns before you import the file.

Watch as I demonstrate these steps – this tip will save you a lot of time and avoid frustration.

(Note: This is a re-posting so that I can feed this video lesson to my Podcast at the iTunes store.)

Follow this link to view or subscribe to the “Danny Rocks Tips and Timesavers” podcast at the iTunes store.

Learn how to “Master Excel in Minutes – Not Months!”

Get External Data in Excel 2007

I created this Excel Video Lesson in response to a viewer request. He wants to learn how to move files that contain dates, text and numbers from a different program into Excel. Excel 2007 gives you an easy to follow Wizard from the Data Tab of the Ribbon to Get External Data.

As I stress in this lesson – “Resist, resist, resist … the urge to go to the Office Button (File Menu) and choose Open. No, no , no… Use the Get External Data Wizard. Watch this short lesson to see how to bring information in from Word 2007 and from Access 2007. I also show you how to save an Excel 2007 file as a Text File (.txt) to make it easy to open it in almost any program.

If you enjoyed this lesson, I invite you to shop for my DVD, “The 50 Best Tips for Excel 2007.”The Store for The Company Rocks is a secure shopping site. And, I personally guarantee your satisfaction – or I will refund your purchase price! Click here to start shopping.

You can watch this Excel Training video on my YouTube Channel – DannyRocksExcels

Related Videos

Use the Transpose Feature to Change the Orientation of Data Imported into Excel

I am working through the special requests that viewers have sent me. In this lesson, I show you how to:

  • Use Data – Get External Data – to import a simple delimited text file.
  • Use Copy – Paste Special – Transpose – to make a copy of the imported data that is now “vertically oriented.” i.e. The field entries run down the column rather than across the rows.
  • Use the Data – Text-to-Columns feature to break an “address block” (City, State, Zip Code) that is one cell into three distinct cells. This is a terrific time saver!

Now available for purchase: My DVD “The 50 Best Tips, Tricks, and Techniques for Excel 2007”

Over 5 1/2 hours of training. Each video lesson focuses on one tip and averages 6 minutes.

Now available from the online store at www.thecompanyrocks.com

Related Videos