Judging by the number of calls that I get from my viewers, working with Time Period Calculations is one of the most problematic challenges in Excel. My goal for this tutorial is to demonstrate how you can easily avoid the frustrations when you calculate elapsed time and total a series of time – e.g. hours worked during the week.
Apply a Custom Format to Formula Cells
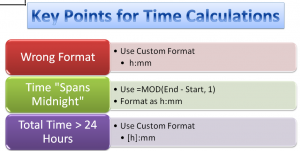
When you create an Excel Formula that subtracts a Start Time from an End Time, you are likely to get a result that looks like 2:30 AM. This is not what you want to see! The solution is to apply a Custom Time Format – e.g. h:mm – to the formula cell(s).
Time that “Spans Midnight”
Many people work the “Graveyard Shift.” The start work late in the evening and they end work early the next morning. The problem that occurs when you want to calculate the number of hours worked is that Excel believes that you are performing a “negative time” operation and the result is a cell filled with ######## (Hash Marks). This happens because Excel thinks that both the Start Time and the End Time belong in the same day. To solve this, you could use an IF() Function formula. However, there is a much easier formula to use as I demonstrate in this video. It uses the MOD() Function.
Total Hours Worked
Use the SUM() function to total 8:00 hours worked each weekday. You are expecting to see 40:00 hours worked. So why does Excel return 16:00 hours instead? By default, Excel interprets 24:00 hours as a single day. So it subtracts 24:00 from the 40:00 hours worked to return 16:00 hours. Unless you make a formatting change to the formula cell you are going to have many unhappy and under paid employees.
The solution? Apply the [h]:mm Custom Formatting to the Formula Cells. Amazingly enough, Excel does not include [h]:mm as one of the Custom Formats in the list. So, simply edit one of the other formats and you will now have the correct answer displayed for your formula!
Learn More Tips for Excel
I invite you to visit my secure online shopping website – http:shop.thecompanyrocks.com – to preview all of the resources that I offer including “The 50 Best Tips for Excel 2007” DVD-ROM.
Subscribe to the “Danny Rocks Tips and Timesavers” Video Podcast on iTunes
I offer a free video podcast for many of my video tutorials at the iTunes Store. Follow this link to see all of the Podcasts that I have posted. If you like what you see, I invite you to subscribe to this free service.
Watch Tutorial in High Definition
You can view this tutorial in High Definition on my YouTube Channel – DannyRocksExcels.
 How to Perform Time Period Calculations in Excel [ 7:55 ] Play Now | Play in Popup | Download (1635)

