Write an Excel Macro in VBA to Update Worksheet Tab Name

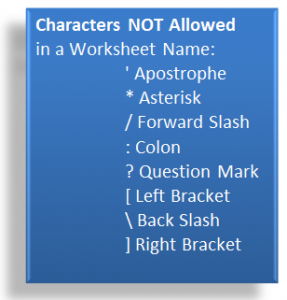
Characters Not Allowed in Worksheet Names

Characters Not Allowed in Worksheet Names

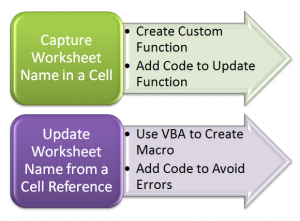
This is Part 2 of my two-part series of video tutorials where I demonstrate how to link an Excel Worksheet Tab Name and the contents of a Worksheet Cell.

In this lesson, I show you how to write an Excel Macro in VBA (Visual Basic for Applications) that will update the name of the Worksheet Tab based on the value of a cell in that worksheet.

Write Excel Macro in VBA

For this Macro, the first line of code will prevent the Macro from crashing if the cell contains one of the “disallowed” characters that you see in the diagram

On Error Resume Next

The second line of code initiates a “For – Next” loop of instruction

For Each ws In Thisworkbook.Worksheets

The third line of code is the Instruction to follow in the “For – Next” Loop

ws.Name = Left(ws.Cells(1,5).Value, 31)

Here, this instruction is saying – in plain English – “Nane this Worksheet (ws) using the leftmost 31 characters in the cell that is in the 1st row of the 5th column – (Cell E1)”

The reason for including 31, is that that is the maximum number of characters allowed in an Excel Worksheet Tab Name.

The fourth and fifth lines of code complete the macro – watch the video to see what they are (What a “tease” I am!!)

Run Macro from Command Button

In this lesson I also show you how to run this Macro from a command button that I add to the Quick Access Toolbar in Excel 2007 or Excel 2010.

Watch Video in High Definition on YouTube

 Click on this link to watch this Excel Video Tutorial in High Definition on my YouTube Channel – DannyRocksExcels

Source for This Code

I found the code for this example in one of Bill Jelen, Mr. Excel’s Books, “Excel Gurus Gone Wild.”

Bill’s website is: http://www.mrexcel.com/

Watch Part 1 of this Series

Here is the link to Part 1 of this series. I show you how to write a Custom Excel Function to insert the Name of the Worksheet Tab into a cell on the worksheet.
Write a Custom Excel Function to Link Worksheet Tab Name to a Cell

Custom Functions in Excel

Custom Excel Functions

In response to many viewer requests, I am creating a two-part series of video tutorials that show you how to create links between the name of an Excel Worksheet Tab and a cell on that worksheet.

Here, in Part One, I demonstrate how to write a Custom Excel Function to capture the name of the worksheet tab in a cell.

Write Custom Excel Functions

You write Custom Excel Functions in the Visual Basic Editor. One way to open the Visual Basic Editor is to use the keyboard shortcut Alt + F11. Here are the elements that I use in this lesson:

  • Open the Project Explorer Pane (Keyboard Shortcut Ctrl + R).
  • Insert a Module to contain the VBA Code that you write for your Custom Function
  • Open the Code Pane (Keyboard Shortcut F7).

Write the Code for the Custom Function

In its simplest form, this is all of the code that you need for this Custom Excel Function:

Function SHEETNAME2() As String
SHEETNAME2 = Application.Caller. Parent.Name
End Function


That’s it!

Automatically Update Results of Custom Functions

A major difference between Custom Functions that you write and Excel’s Built-in Functions is that by default, the result of a Custom Function does not automatically update when values or references change. If you want your Custom Function to automatically update whenever the worksheet changes, add this line of code to your Custom Function in the Module:

Application.Volatile True

Source for this Code

I found the code for this Custom Excel Function in John Walkenbach’s Book, “Excel 2007 Formulas. He is an Excel Expert and I admire his writing style. You can check out his reources at this site:

http://spreadsheetpage.com/

Watch this Video in High Definition on YouTube

Click on this link to view this Excel Tutorial on my YouTube Channel – DannyRocksExcels.

Watch Part 2 of This Series

Here is the link to Part 2 in this Series. In this lesson I show you how to write an Excel Macro in VBA to update the Name of the Worksheet Tab based upon the value in a cell on the worksheet.

How to Take Advantage of Excel 2007 – 2010 Tables and Excel 2003 Lists

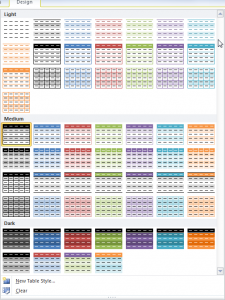
Excel Table Styles

Excel Table Styles

In this video tutorial, I cover multiple versions of Excel. I demonstrate how to take advantage of the Table Tools that were introduced in Excel 2007 and I also show you how to create Excel 2003 Lists.

Topics Covered on Video Tutorial

  • Convert a range of data to an Excel 2007, Excel 2010 Table.
  • Convert a range of data to an Excel 2003 List.
  • View and change the Total Row in each version of Excel.
  • Append new records to Tables and Lists.
  • Add a new field to Tables and Lists.
  • Write a formula in one cell of an Excel Table and have it automatically copy down for each record.
  • Change the Table Styles in Excel 2007 and 2010.
  • Use Conditional Formatting to add alternate row shading to an Excel 2003 List

Watch Video in High Definition on YouTube

Follow this link to watch this Excel Video Tutorial in High Definition on my YouTube Channel, DannyRocksExcels

Download This Excel Workbook

Click on this link to download the Excel Workbook that I used in this video tutorial.

Get my best-selling DVD-ROM, “The 50 Best Tips for Excel 2007” for only $39.95!

How to Maintain Accurate Subtotals When Your Data Set Expands in Size

Subtotal in Excel 2010 Table

Subtotal in Excel 2010 Table

This is Part 2 of my series of video tutorials demonstrating how to use the SUBTOTAL Function in Excel.

  • In Part 1, I showed you the value of using the Subtotal Function to summarize the results of applying a Data Filter to a range of cells.
  • In this part, I show you how to use an Excel 2007 or Excel 2010 Table to ensure that your Subtotal Formulas are automatically updated when you append records or add additional fields to your original data set.

I strongly recommend basing Filtered Lists and Pivot Tables on an Excel Table (in Excel 2007 or 2010) or an Excel List in Excel 2003. This way, any formulas, filters and references that you make will be automatically updated when you append additional records or otherwise change the structure of your data set.

Function Numbers 101 through 111

Notice that when you “toggle on” the Total Row for a Table or List that Excel uses this formula = SUBTOTAL(109, Table1, [Sales]). Function 109 will use the SUM Function(109) to total the values in the “Sales” field ([Sales]) of a Table named “Table1.” These Function Numbers + 100 were introduced in Excel 2003 and the are automatically applied whenever you are using a Total Row in an Excel Table.

I think that you will learn some cool tricks in this lesson. Let me know what you think!

Watch This Video in High Definition

Click on this link to watch this video tutorial in High Definition, Full Screen Mode on my YouTube Channel – DannyRocksExcels.

Invitation to Visit My New Online Shopping Site

I invite you to visit my new, secure online shopping website – http://shop.thecompanyrocks.com

Once there, you can get my best-selling DVD-ROM, “The 50 Best Tips for Excel 2007”

New Keyboard Shortcuts for Paste Special in Excel 2010

Content Key on Keyboard

Content Key on Keyboard

In Excel 2010, you can now use special keyboard shortcuts to control your Paste Special Options – e.g. Paste Values Only, Transpose, Paste Link, Paste Formatting, etc.).  There is a new technique to learn, however, before you can become proficient with these keyboard shortcuts in Excel 2010. Let me demonstrate.

Live Preview for Paste Special in Excel 2010

In my previous video tutorial, I demonstrated how to take advantage of this great new feature – “Live Preview for Pasting” – in Excel 2010. Click here to watch that video.

Two Ways to Use Keyboard Shortcuts to Paste Special in Excel 2010

  1. Press and Release the Ctrl Key, then press the “letter key” for the shortcut.
  2. Press the “Context Key” on your keyboard (to the right of the Space-bar; between the Alt & Ctrl keys) and then press the “letter key” for the shortcut.

Each of these techniques is easier to explain through a video demonstration than to write out the instructions. So, I encourage you to watch my video if you want to learn these new techniques for Excel 2010!

Learn More Paste Special Options

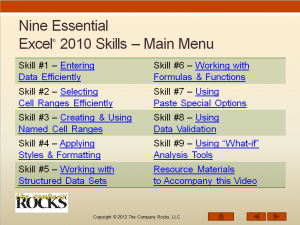
Main Menu Essential Skills for Excel

Main Menu for “9 Essential Excel Skills”

On my latest DVD-ROM, “Nine Essential Skills for Excel 2010,” I go into greater detail about the many ways that you can use Paste Special. This IS one of the 9 Essential Skills that I have identified. Follow this link to learn more about the 4 hour training video. The DVD-ROM includes 25 individual video tutorials, a 29-page instructional manual,  and the Excel 2010 Practice Files that I used while filming the videos.

Learn about all of the training resources that I offer at my secure online shopping website – http://shop.thecompanyrocks.com

Watch Video in High Definition on YouTube

Follow this link to watch this video tutorial in High Definition on my YouTube Channel – DannyRocksExcels.

Introducing Live Preview for Paste Special in Excel 2010

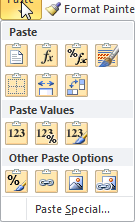
Paste Special Gallery

Gallery of Paste Special Options

I have always loved the many “Paste Special Options” available in Excel. Now, in Excel 2010, there is a great new tool available – “Live Preview of a Gallery of Paste Special Options” – to help you to discover or to choose the best way to paste items copied to the clipboard.

From either the Paste Menu on the Home Tab of the Excel 2010 Ribbon or from the right-click shortcut menu, you can hover your mouse over one of the Gallery Icons to see a “Live Preview” of your Paste Special Option Selection.

When I demonstrate this feature  to my clients, they are amazed to discover the many options that are available! Of course, some of these same clients are also “overwhelmed” by all of the choices on the menu!

That is why I created this video – to help you to discover and to select the best Paste Special Option for your needs.

Paste Between MS Office Programs

Later in this video tutorial, I also show you how to use the Microsoft Office Clipboard and the Gallery of Paste Special Options to copy a data set from Excel and Paste it as a Picture in a Word document. With the Office Clipboard, you can cut, copy and paste up to 24 items between Excel, PowerPoint and Word. However, you must first open up the Office Clipboard for this tool to be available to use.

Additional Paste Special Features in Excel 2010

I have decided to produce an addition video tutorial to demonstrate how to use some new Keyboard Shortcuts in Excel 2010 to take advantage of the Paste Special Options.

Watch Video in High Definition Mode

Click here to watch this video in High Definition, Full Screen Mode on my YouTube Channel – DannyRocksExcels

My Extended Length Pivot Tables Video Recordings Available for Excel 2003, 2007 and Excel 2010

On my WebEx site – http://thecompanyrocks.webex.com – I have posted three, one-hour-plus video recordings to help you to learn how to create and customize Excel Pivot Tables:

Download “Free of Charge” Resources for Each Recording

Click on the hyperlinks above to go to a special landing page for each Excel version. From the landing page, you will find links to download the resources that accompany each version:

  • The Excel Workbook – in each version of Excel (2003, 2007, 2010) that I use during the video recording.
  • The Step-by-Step Instructional Manual that I created for each Excel version of my recordings.
    • Available as an Adobe Acrobat PDF or as a Word Document

Very Attractive Pricing for Recordings

I have decided to price each of these recordings – which you can download to your computer – at US$9.95

  • Imagine what you would have to pay to hire a trainer – per hour –  to teach you these Pivot Table lessons!
  • Imagine how many pages in a book you would have to wade through to read about Pivot Tables!
  • Now, imagine being able to:
    • Watch a video demonstration of the steps to take to create or customize a Pivot Table.
    • Read – and make notes in – a written document that follows the steps that I demonstrate.
    • Practice the techniqes that I demonstrate on the video with the actual Excel worksheets that I use.
    • Skip back and forth to the chapter that you want to watch or review on the video recording.
    • Download the recording for the exact version of Excel that you are using.
    • Get all of this for only US$9.95

What You Will Learn on My Video Recordings

I have taken care to organize each of these topics “by chapter” – with starting points and ending points – on the recordings:

  • Create a Pivot Table in the Excel version that you are using.
    • Spotlight the uniqe features of each version
  • Filter and Sort the Fields in your Pivot Table
  • Change the Data Source & Refresh your Pivot Table
  • Use Multiple Functions and Views to Calculate your Pivot Table
  • Create a Calculated (“virtual”) Field in your Pivot Table
  • Group Fields – e.g. turn daily transactions into a Month, Quarter, Year Pivot Table Report
  • Create and Filter Pivot Charts
Download WebEx Recording

Download WebEx Recording

Download My Recordings at WebEx

  • Go to http://thecompanyrocks.webex.com and on the left side of the screen click on “Attend a Session – Recorded Sessions” to find the recording that you wish to download.
  • Register and enter your payment information – this is a secure shopping site.
  • Download the recording – also download the WebEx Recording Player so that you can play the ARF recording.
    • I recommend that you “Save” your recording on the download page. Play it from your directory of choice after it has downloaded
    • From the ARF Player for the WebEx Recording, you can convert the recording to another video format (MP4, AVI, WMV or SWF)

I welcome your feedback. Send me your questions, comments and suggestions for future recordings.

Still Using Excel 2003? Download My Video Tutorial Pivot Tables 2003 to Summarize, Analyze and Present Data

Video Tutorial for Excel 2003 Pivot Tables

Excel 2003 PivotTables Video

By popular demand, I have created an “Extended Length” ( 69 minutes) video tutorial in Excel 2003 that you can download – for US$9.95  “Create Pivot Tables in Excel 2003 toe Summarize, Analyze and Present the Information in Your Data.”

Quite a few of my customers and viewers are still using Excel 2003. Are you one of them? If so, this is welcome news for you! If you can even find a video tutorial for Excel 2003, chances are it was created “ages ago.” I incorporate current video technology to view online or to download  69 minute video tutorial that will teach you everything that you need to know to create, modify and present a PivotTable or PivotChart Report using Excel 2003.

What You Will Learn from this Video Recording

Here are the topics that I cover – each as an individual chapter on the recording:

  • Creating a PivotTable in Excel 2003
  • Filtering and Sorting Fields in an Excel 2003 Pivot Table
  • Refreshing your PivotTable; Changing the Source Data for your Excel 2003 PivotTable
  • Changing the Functions and Type of Calculations in your Excel 2003 PivotTable
  • Creating a Calculated Field in an Excel 2003 PivotTable
  • Grouping an Excel 2003 PivotTable Field (e.g. Month, Quarter, Year from a series of Daily Transactional Data)
  • Creating and Modifying and Excel 2003 PivotChart

Skip to Individual Chapters on the Video Recording

If you have ever purchased a recording of a “live” Excel Webinar, you know that one frustration is: “How do I get to the specific part of the recording that I want to learn or repeat?”

The last thing that I want you to worry about is “getting stuck” with watching my video recording from start to finish! NO! NO! NO!

That is why I recorded this video webinar with you in mind – I created an easy to follow Table of Contents on the recording so tht you can skip to or repeat an indivual chapter or starting point!

I am confident that you will enjoy this feature!

How to Get Started

  1. Go to http://thecompanyrocks.webex.com and click on “Recorded Sessions” to see the list of all of my Recorded Video Lessons on WebEx by Cisco.
  2. Click on this link to open the Video Recording, “Excel 2003 Pivot Tables to Summarize and Analyze Data”
  3. Register for this recording (First Name, Last Name and email address) so that I can assist you quickly if you need help with downloading the recording or accessing the support materials.
  4. Enter your payment information US$9.95 using PayPal or a Credit Card – This is a SECURE WEBSITE.
  5. Download this video recording. I recommend that you: 
    1. Download the WebEx by Cisco ARF Recorder/ Player. Once you have opend the Video Recording, you can convert it to a different format (e.g. WMV (Windows Media), SWF (Flash Format) or MPEG4 (MP4 Format)
    2. Save the File to a Folder on your hard disk drive.
  6. Watch the video recording.

Download the Support Material for this Video Recording

Here is a link to the web page that I created for this video recording. Follow the hyperlinks to view online or download the Excel Workbook that I used in this recording as well as the Step-by-Step Instructional Manual that accompanies this recording.

Give Me Your Feedback

As I develop these “Extended Length” video recordings, I seek your feedback. Tell me what you liked. Tell me what you did not like – any why. Send me your suggestions for future topics for my video tutorial recordings.

Download My 75 Minute Video Tutorial on Excel 2007 Pivot Tables

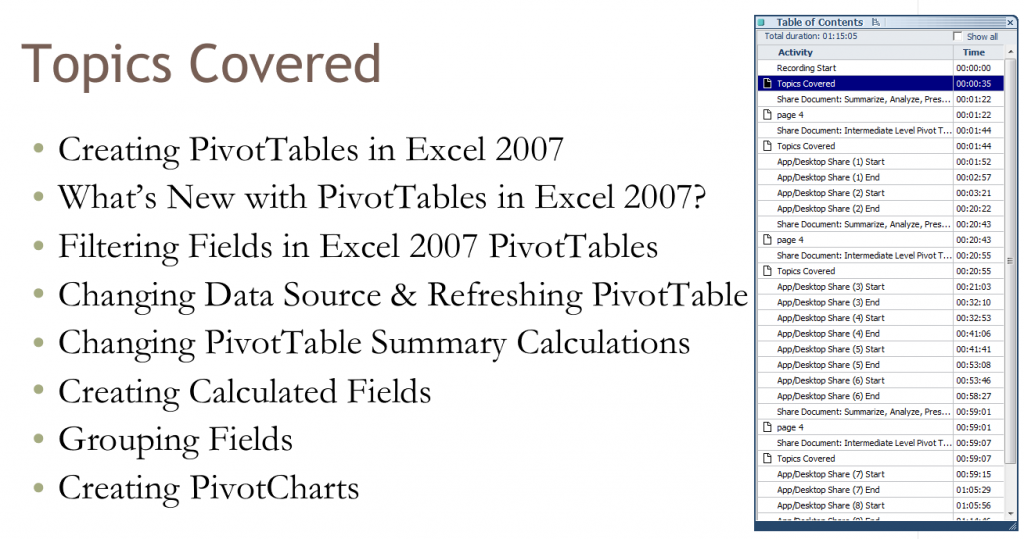
Topics Covered

Table of Contents for Recording

I have just recorded and published a 75 Minute Video Tutorial titled, “How to Create and Modify a Pivot Table in Excel 2007 to Summarize, Analyze and Present the Information in your Data Set.”

It is published on my WebEx by Cisco site: http://thecompanyrocks.webex.com Follow this link to go directly to this recording.

There is a charge for this recording – US$9.95 In addition to the recording you get:

  • A Step-by-step instructional manual
  • Access to the Excel workbook files that I used for this recording

Not to brag , but I think that this video tutorial is excellent! I spent many hours planning out the exercises, working through the timing of each chapter of the video and practicing my delivery. I am happy with the result. And, more important, I think that you will also be satisfied with what you will learn from this recording!

What You Will Learn on My Recording

My goal is to give you a comprehensive understanding of Excel 2007 Pivot Tables. But to give you the opportunity to learn this in “bite-size chunks” that can replay when necessary. I created realistic exercises to illustrate each topic.  Also notice that I have created a Table of Contents for the recording so that you can go to a specific chapter on the recording. You can stop and start at any point.

How to Download this Recording

  1. Go to http://thecompanyrocks.webex.com or click on this link to go to the main menu.
  2. Click on “Recorded Sessions.”
  3. Click the link for the recording, “Excel 2007 Pivot Tables to Summarize Data.”
  4. Register for this session (First Name, Last Name and email address).
  5. Enter payment information (PayPal or Credit Card). This is a secure site!
  6. Follow the instructions to Download my recording.
  7. Recommended – you can also download the ARF Recorder to view the recording.
  8. At this point you can decide to convert the recording to a different format. E.g. WMV (Windows Media Player), SWF (Flash) or MP4 (MPEG4)
  9. At the end of the recording, you are taken to a web page with links to download the Instructional Manual and to download the Excel Workbook that I used during this recoring.

Give Me Your Feedback

I welcome your comments and suggestions for future video tutorial recordings. You can add your comments below or send them to me via email.

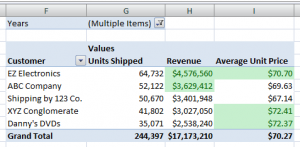
How to Apply Conditional Formatting to a Pivot Table in Excel

A Pivot Table is a great way for you to summarize and present the information contained in your data set. When you apply conditional formatting to your Pivot Table, you can “visually” spot important trends or anomolies in your data.

Improvements to Conditional Formatting

Conditional Formatting in Pivot Table

Condition Formatting for Above Average

Beginning with Excel 2007, Conditional Formatting has been dramatically improved. In addtion to pre-built formula rules, you can also apply Data Visualizations (Icon Sets, Data Bars and Color Scales).

Conditional Formatting for Above Average

In this lesson, I apply the pre-built “Above Average” rule. I want Excel to dynamically format the summary values that answer, “TRUE” to this question: “Is this value “Above the Average” in the range of cells selected?

This is the key to understanding how Conditional Formatting works. Special Formatting is applied only when the answer to your CONDITION (a rule or a formula) is TRUE.

Dynamically Filter Conditional Formatting

In this lesson, I use the Report Filter zone in my Pivot Table to see how conditions change when I change the time period in my report. Values that meet the Condition, “Above the Average,” receive the formatting that I established in my rule. Try this on your Pivot Table. It is a wonderful tool to use in an Excel Dashboard.

View This Video Tutorial in High Definition

Follow this link to watch this lesson in High Definition on my YouTube Channel, DannyRocksExcels.

My Extended Length Pivot Table Video Tutorials

I offer “free of charge,” a 24 minute in-depth video tutorial for creating your first Pivot Table in Excel. Follow this link to learn how to view it online or to download it to your computer.

Vist My New Online Shopping Site

My new, secure online shopping website – http://shop.thecompanyrocks.com/ – is now open. I invite you to visit and learn more about the new products that I have added.